Arduino
Arduino Inrtoduction
Arduino is an open-source electronics platform based on easy-to-use hardware and software. Arduino boards are able to read inputs - light on a sensor, a finger on a button, or a Twitter message - and turn it into an output - activating a motor, turning on an LED, publishing something online. You can tell your board what to do by sending a set of instructions to the microcontroller on the board. To do so you use the Arduino programming language (based on Wiring), and the Arduino Software (IDE), based on Processing.
Reference
Archived Library Examples | Arduino Documentation
Open source
Open source software is software with source code that anyone can inspect, modify, and enhance.
“Source code” is the part of software that most computer users don’t ever see; it’s the code computer programmers can manipulate to change how a piece of software—a “program” or “application”—works. Programmers who have access to a computer program’s source code can improve that program by adding features to it or fixing parts that don’t always work correctly.
open hardware
“Open hardware,” or “open source hardware,” refers to the design specifications of a physical object which are licensed in such a way that said object can be studied, modified, created, and distributed by anyone.
Open hardware’s source code should be readily accessible, and its components are preferably easy for anyone to obtain. Essentially, open hardware eliminates common roadblocks to the design and manufacture of physical goods; it provides as many people as possible the ability to construct, remix, and share their knowledge of hardware design and function.
Reference
Case No.1
Run water light program
To control a single LED, you only need to give the pins high and low levels to control the light on and off.
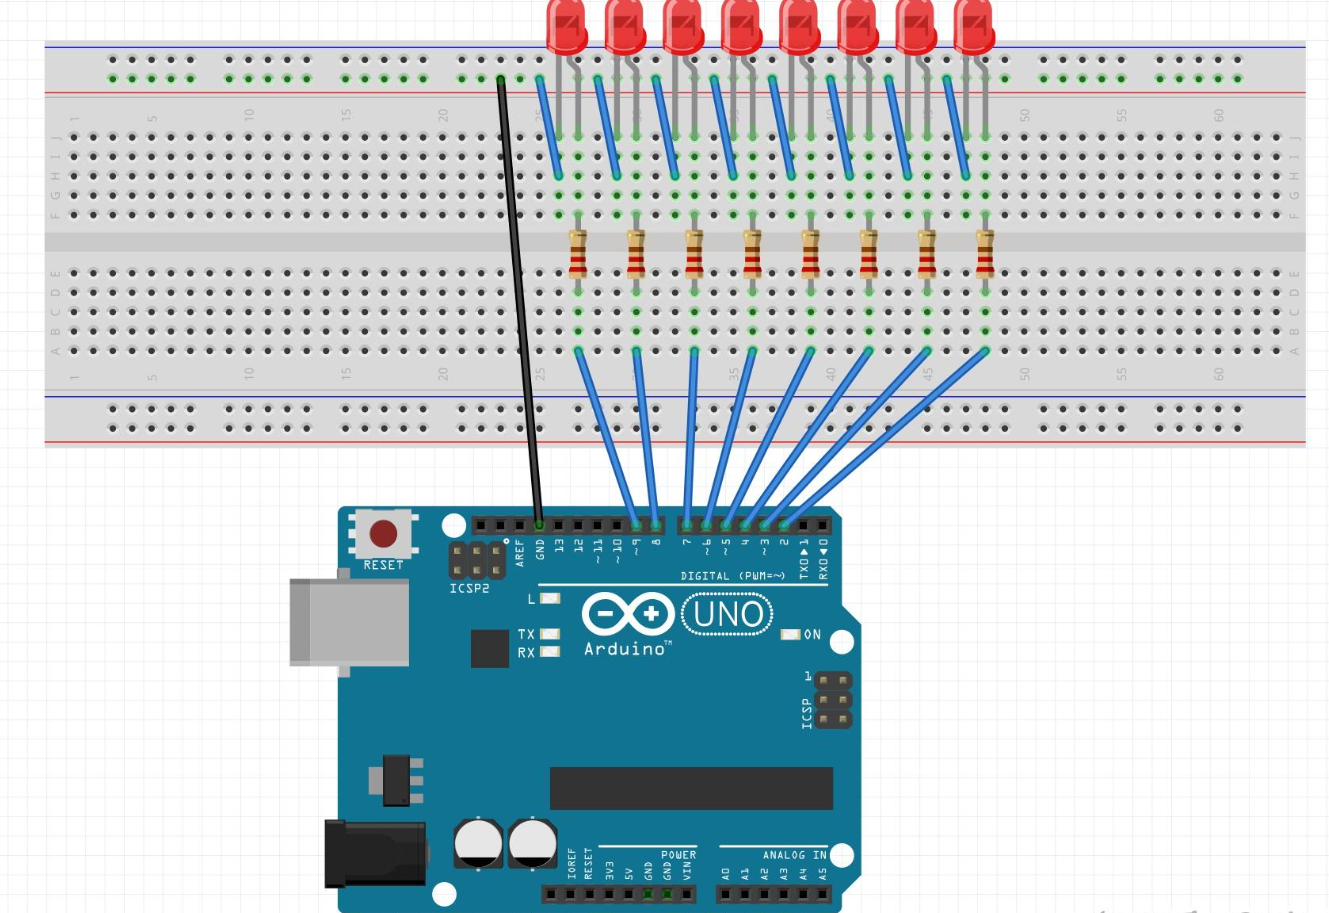
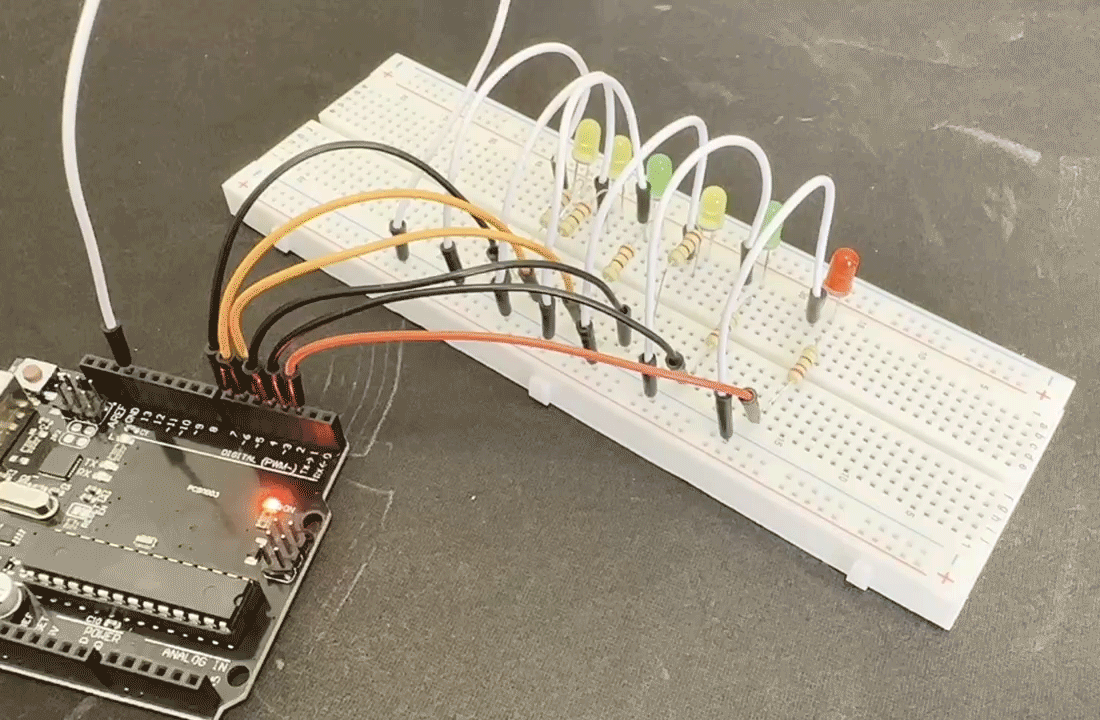
Running lights: Multiple LED lights.
Multiple pin settings need to be used, so pins 2-7 are used here.
Control the lights on and off separately to achieve the effect of running lights.
The effect of the running water lamp: the lights that are fully off are lit one by one, and then gradually extinguished to the beginning end, and the cycle can be, of course, there can be other effects, and you can set it yourself.
Selection of input module and output module
Arduino UNO development board
6 LED lights
Dupont Lines
USB interface
Programming environment
Arduino IDE
Tinkercad diagram
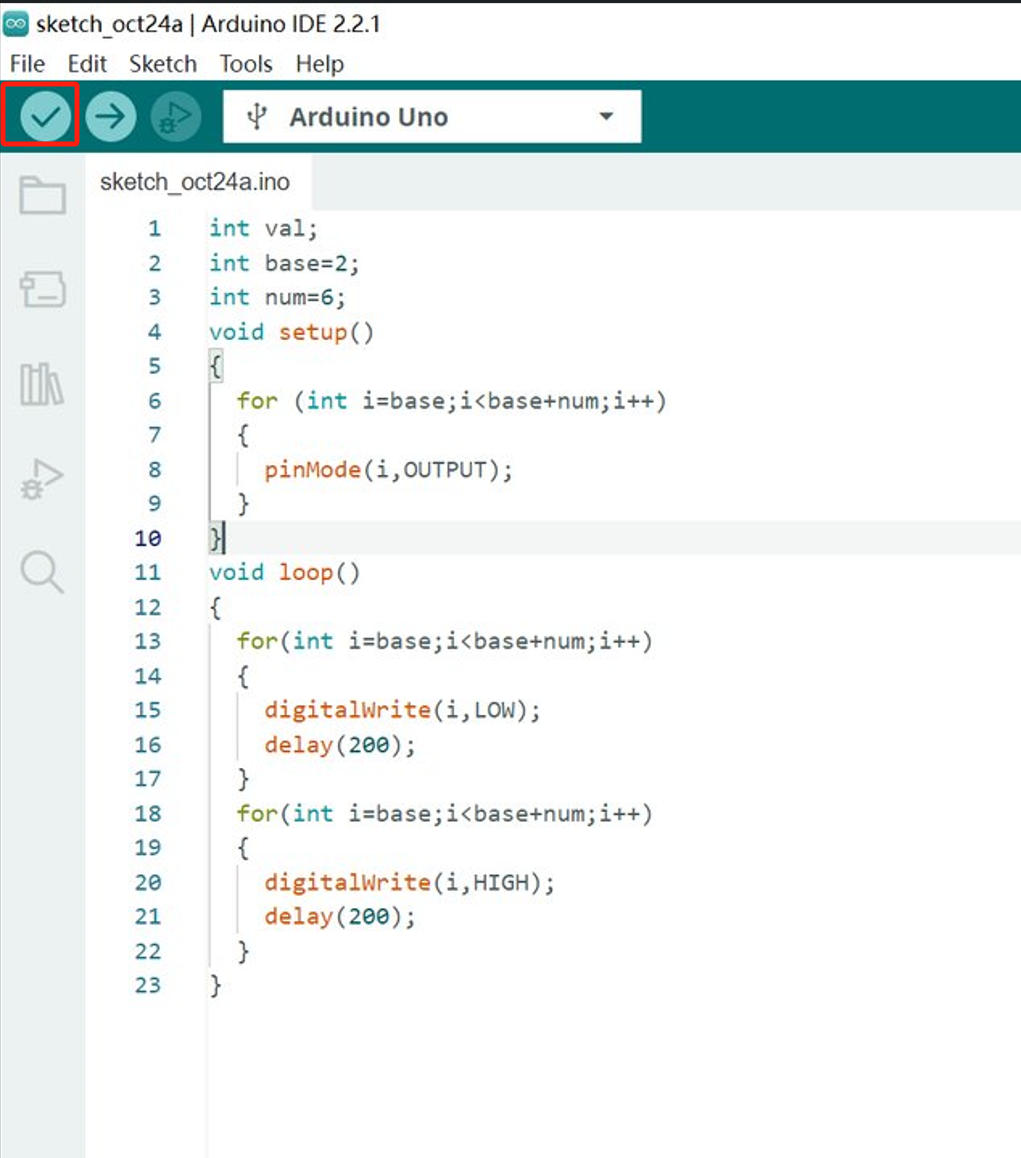
The code and basic logic of the case
1 | int val; |
how to upload it
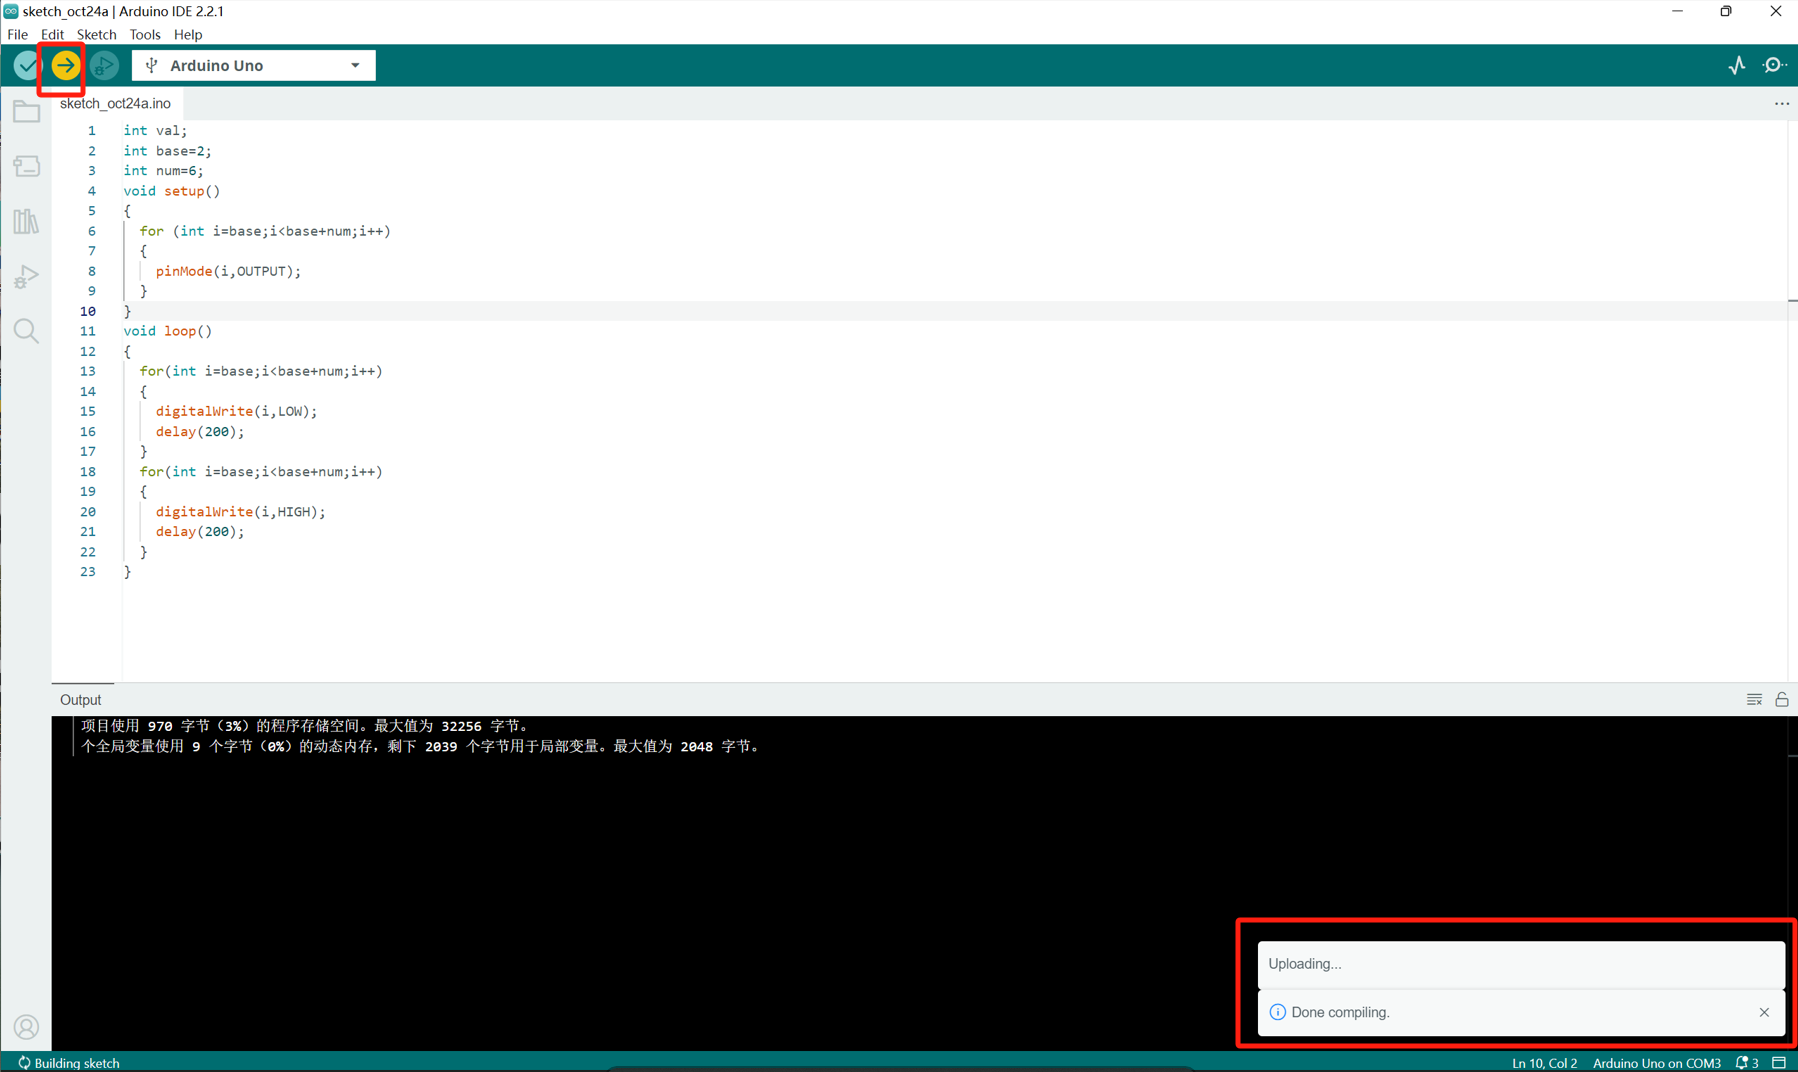
Presentation of achievements
The LED lights turn on one by one and then turn off one by one
Case No.2
Use ultrasonic sensor to change the WS2812B LED Circle‘s color
In this tutorial,we are going to build a programe and learn how to use arduino to change the distance far or close to control ES2812B RGB LED cirle’s color.
These LED strips usually come with a removable tape, so that you can stick them wherever you want. The problem is that they don’t stick very well, so chances are that you’ll find your strip in the floor the following day.
The solution: I found this strip case that diffuses the light well and you can screw it to a shelf, for example, if you want a permanent solution.
Hardware Require
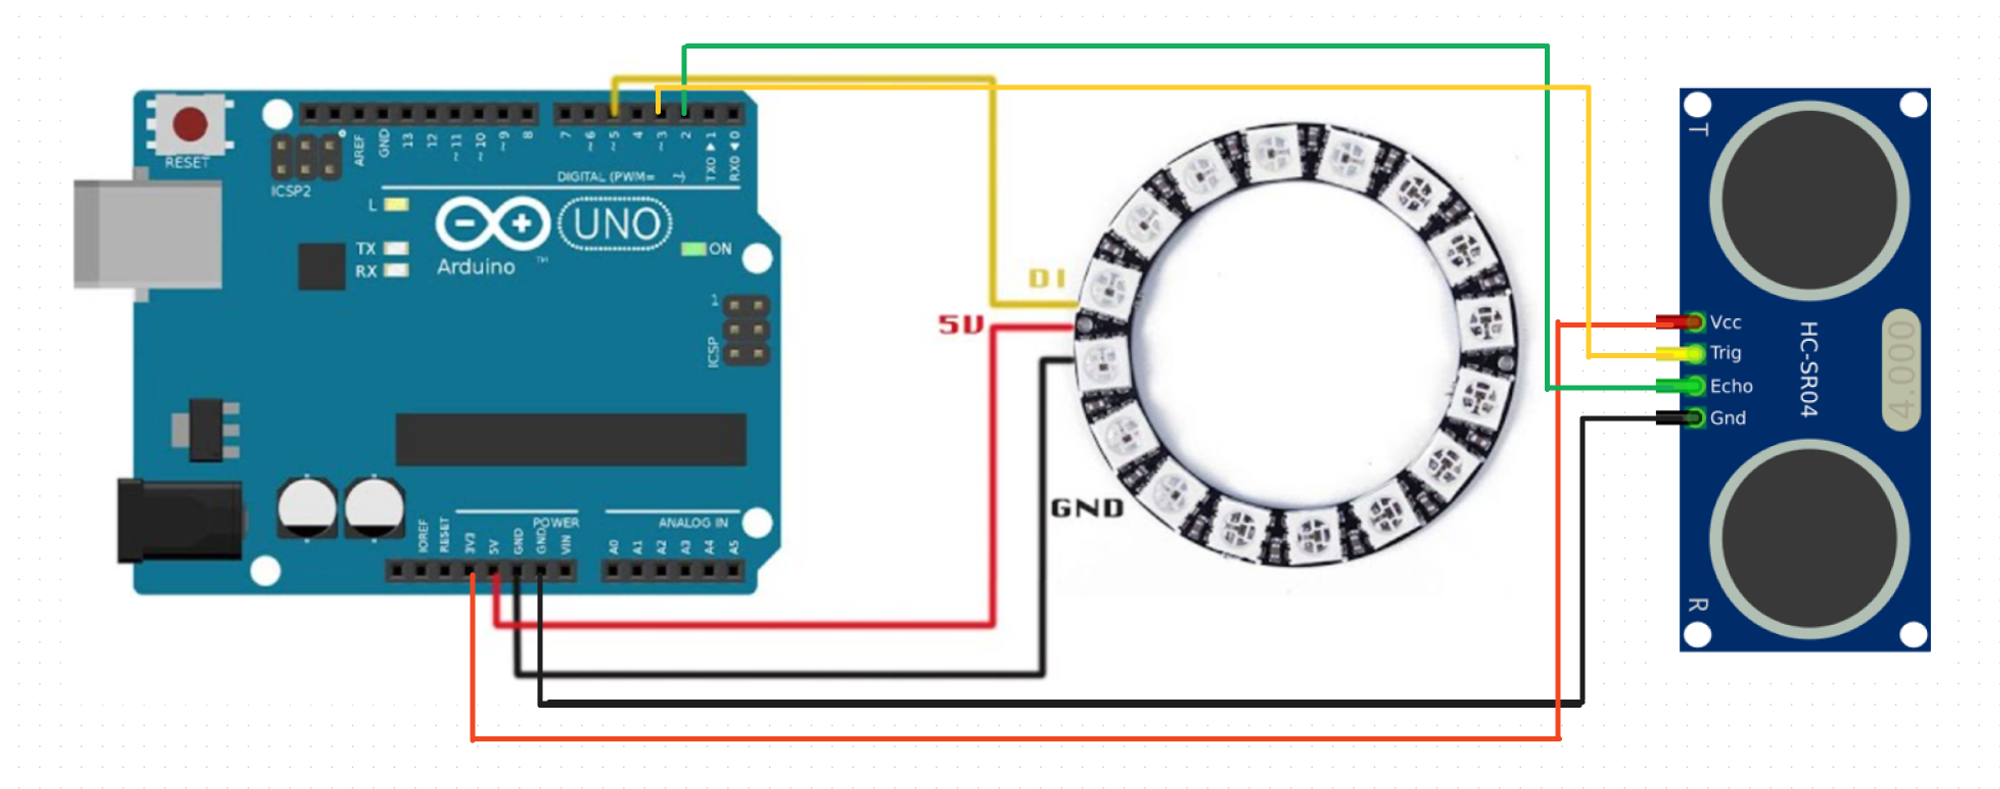
1.Arduino UNO
2.Jumper wires
3.DIYables USB Cable for Arduino Uno
4.Ultrasonic sensor
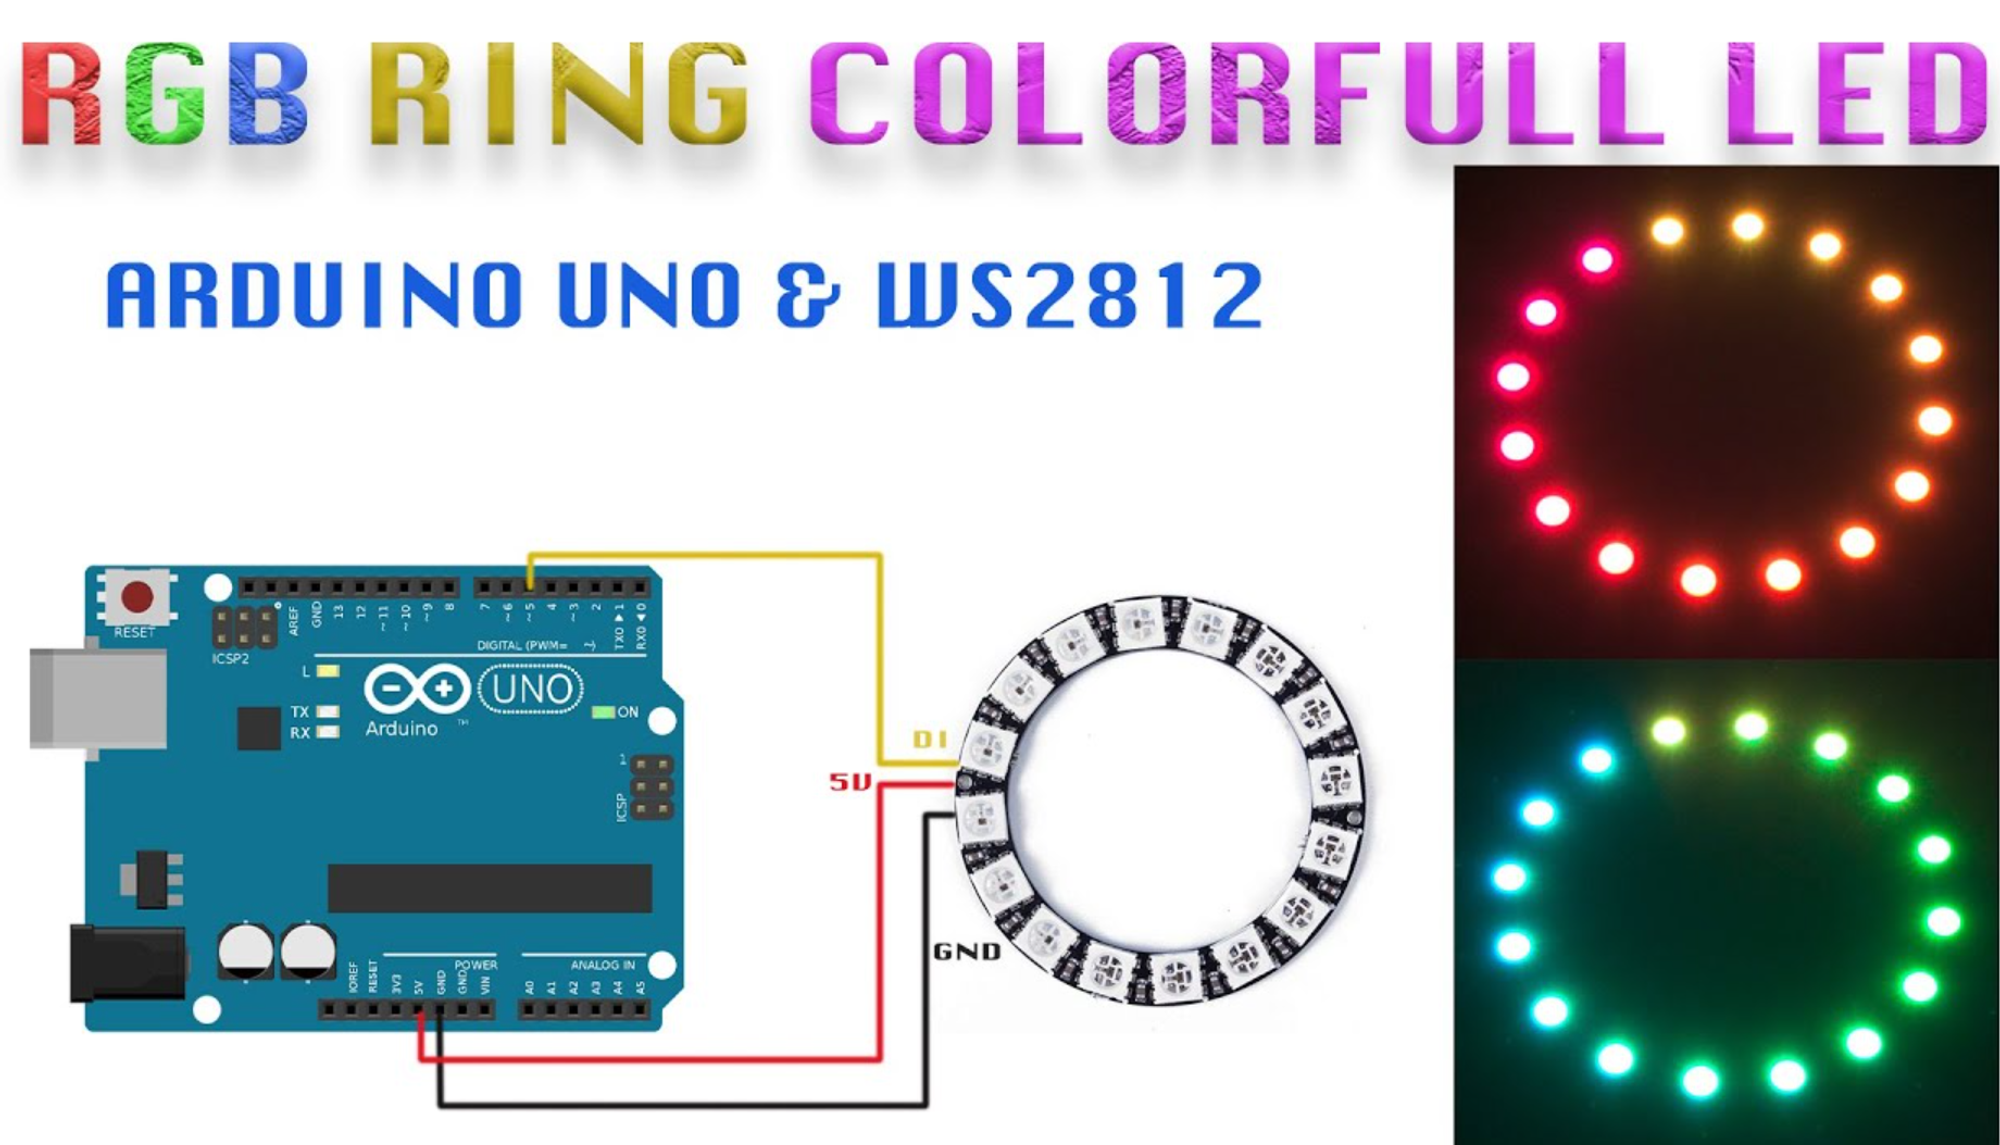
5.WS2812B RGB LED Circle
Selection of input module and output module
Ultrasonic sensor is used to measure the distance to an object by using ultrasonic waves.This sensor reads from 2cm to 400cm (0.8inch to 157inch) with an accuracy of 0.3cm (0.1inches), which is good for most hobbyist projects. In addition, this particular module comes with ultrasonic transmitter and receiver modules. 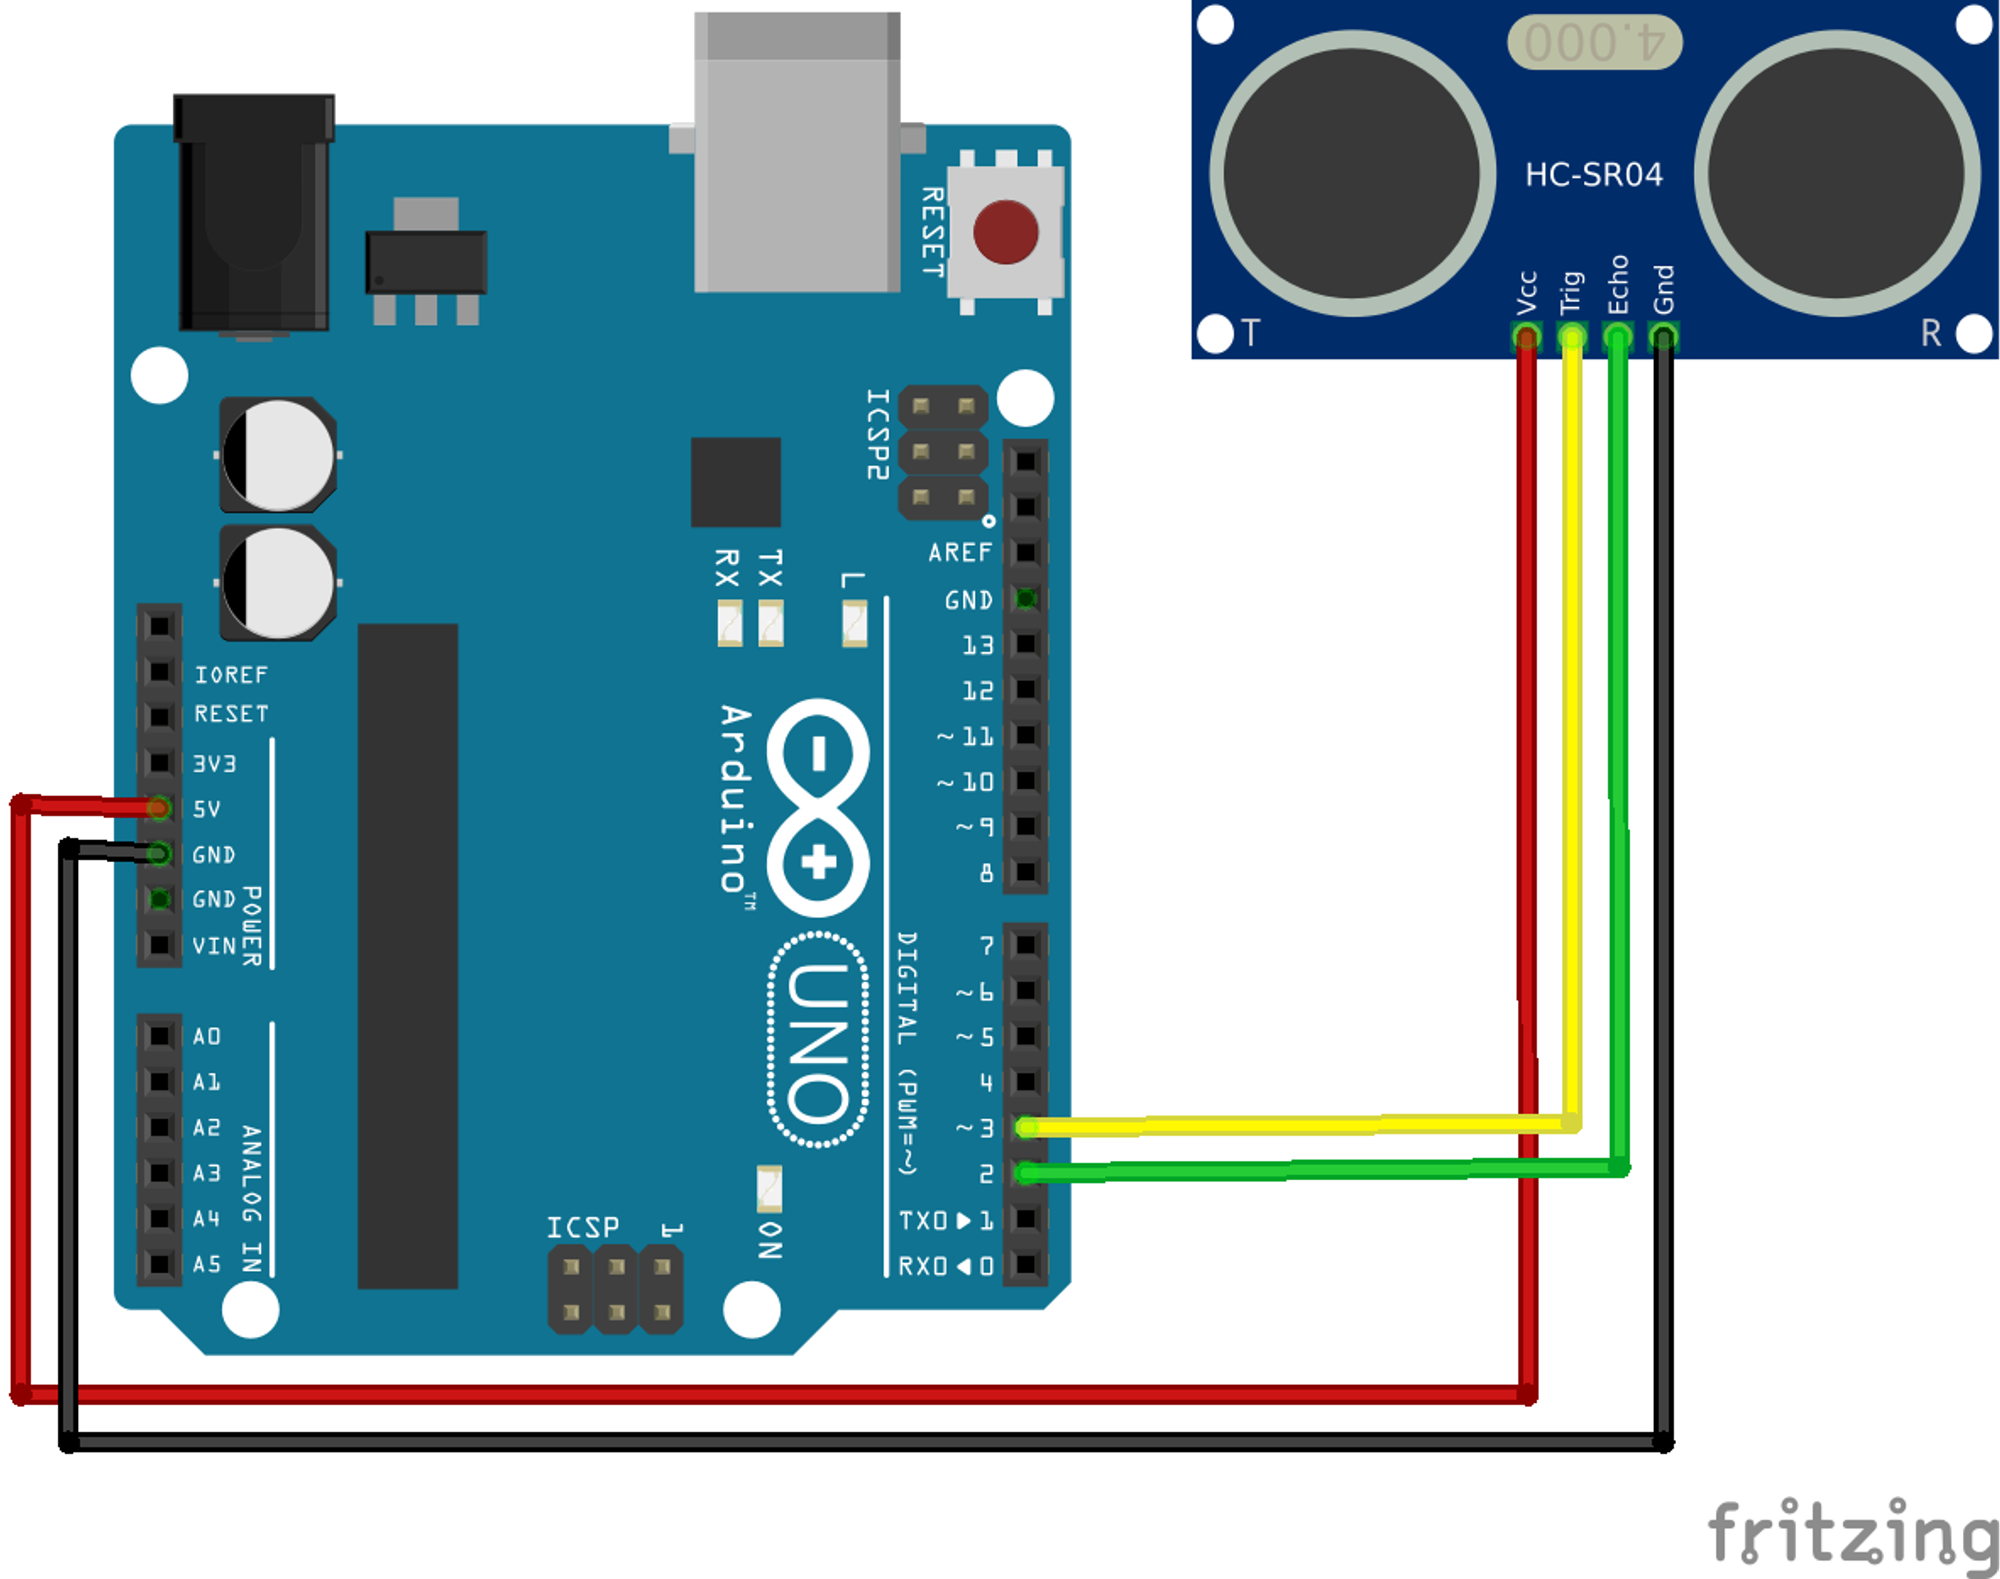
Tinkercad diagram
Here’s the pinout of the HC-SR04 Ultrasonic Sensor.
| VCC | Powers the sensor (5V) |
|---|---|
| Trig | Trigger Input Pin |
| Echo | Echo Output Pin |
| GND | Common GND |
WS2812B RGB LED Circle
Each pixel can have its own color and brightness as your wish.
The code and basic logic of the case
1 |
|
Demonstration
If the hand is getting close to the Ultrasonic sensor within the distance less than 15cm, then the light will turn into Blue. Otherwise, the light will turn into Green, and we can add more distance intervals to change the light color through chang the colorwipe.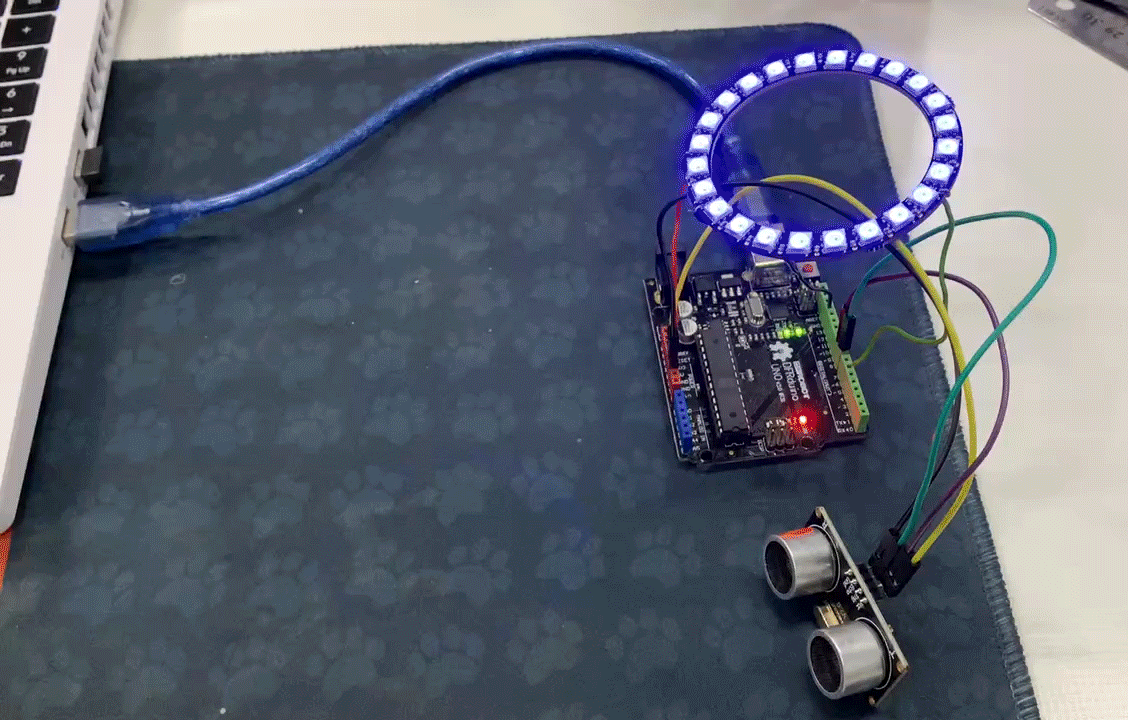
Comparison Open Source Projects
simillar to Our Final Project
Digital Fabrication of Pneumatic Actuators with Integrated Sensing by Machine Knitting
Introduction:
Soft actuators with integrated sensing have shown utility in a variety of applications such as assistive wearables, robotics, and interactive input devices. Despite their promise, these actuators can be difficult to both design and fabricate. As a solution, we present a workflow for computationally designing and digitally fabricating soft pneumatic actuators via a machine knitting process. Machine knitting is attractive as a fabrication process because it is fast, digital (programmable), and provides access to a rich material library of functional yarns for specified mechanical behavior and integrated sensing. Our method uses elastic stitches to construct non-homogeneous knitting structures, which program the bending of actuators when inflated. Our method also integrates pressure and swept frequency capacitive sensing structures using conductive yarns. The entire knitted structure is fabricated automatically in a single machine run. We further provide a computational design interface for the user to interactively preview actuators’ quasi-static shape when authoring elastic stitches. Our sensing-integrated actuators are cost-effective, easy to design, robust to large actuation, and require minimal manual post-processing. We demonstrate five use-cases of our actuators in relevant application settings.
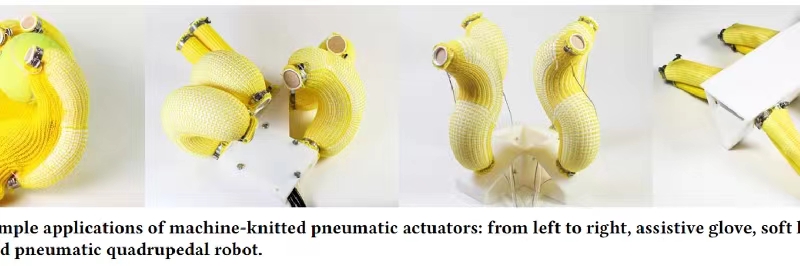
Smiliar with our work:
- Same as the project using pneumatic devices
- Both of them integrated with interactive input devices
Adventage:
- One notable advantage of the presented method is the ability to rapidly fabricate sensing-integrated pneumatic actuators using machine
- Another advantage lies in the integration of resistive pressure sensors and swept frequency capacitive sensing electrodes. These components can be seamlessly integrated into the actuators using conductive yarns. This integration allows the sensors to remain resilient to the effects of large actuation, ensuring accurate
- Additionally, the inclusion of a user-friendly design
Disadvantage/Limitation:
- Complex actuator/sensing design. Currently, it is challenging to incorporate our sensors over the entire body of the actuator, given the extensive stretching of the elastic yarn.
- Actuators of diverse shapes and sizes. As demonstrated by recent work , machine knitting is compatible with complex 3D geometry.
- The granularity of actuation. The bending performance of the actuator is determined by the knitted sheath designs as well as pneumatic channel properties, e.g., wall thickness, radius, and materials.
- Sensing. As one limitation, during grasping, we notice that direct contact with grasped objects mostly occurs at the fingertips, which limits the utility of our integrated sensors distributed throughout the actuators.