Environment Preparation
Node Environment Setup
Hexo is written in Node.js, so you need to install Node.js and the npm tool within it.
Windows download path: Node Official Website
According to the computer configuration and actual needs to download the corresponding version, select the 64-bit, Windows Installer(.msi) LTS version.

Git Environment Setup
A distributed version control system used for project version control management, operate git using the Git Bash command line tool.
Windows download path: Git Official Website

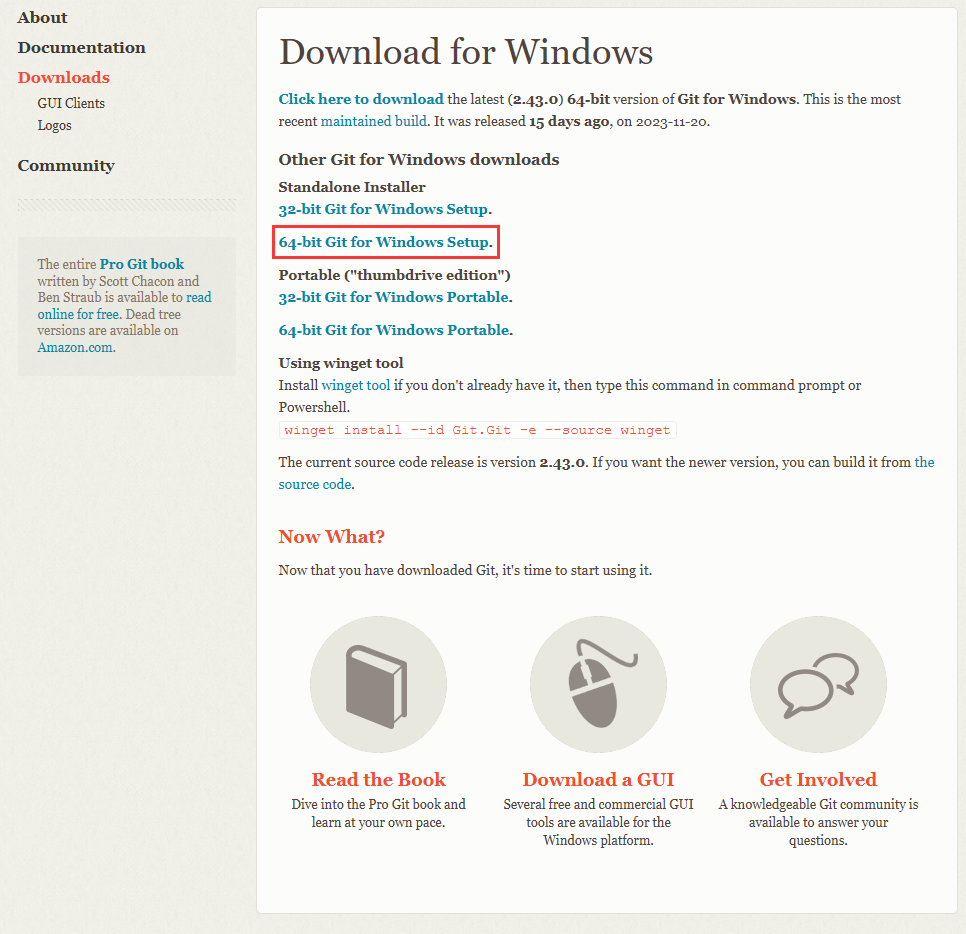
Verification of Successful Setup
To open the command line, use win+R and type cmd, Enter the following commands in the command line in sequence, if successful, the corresponding version number will appear
1 | git --version |

Other Tools
Visual Studio Code: Visit https://code.visualstudio.com/ to download Vscode used in the writing of the code and project management.
Typora: Used to edit Markdown documents Visit https://typoraio.cn/ to download it. This is a very simple and easy to use Markdown editor. It supports all features of Markdown syntax, including titles, lists, references, code blocks, etc. It also supports the ability to insert images, links, tables, etc. In addition, Typora also supports instant preview function, you can see your Markdown document in real time, without manually reloading the page.
Hexo
Introduction
- Hexo is a fast, clean, and efficient blogging framework. Hexo parses articles using Markdown (or another rendering engine) and generates static pages with beautiful topics in seconds.
- Check out the official Hexo documentation for more details
Installation
First of all, after installing node.js and Git above, we can choose to install hexo from a specific folder. After selecting a folder, right click in the folder and select ‘Git Bash here’ to open the git command line
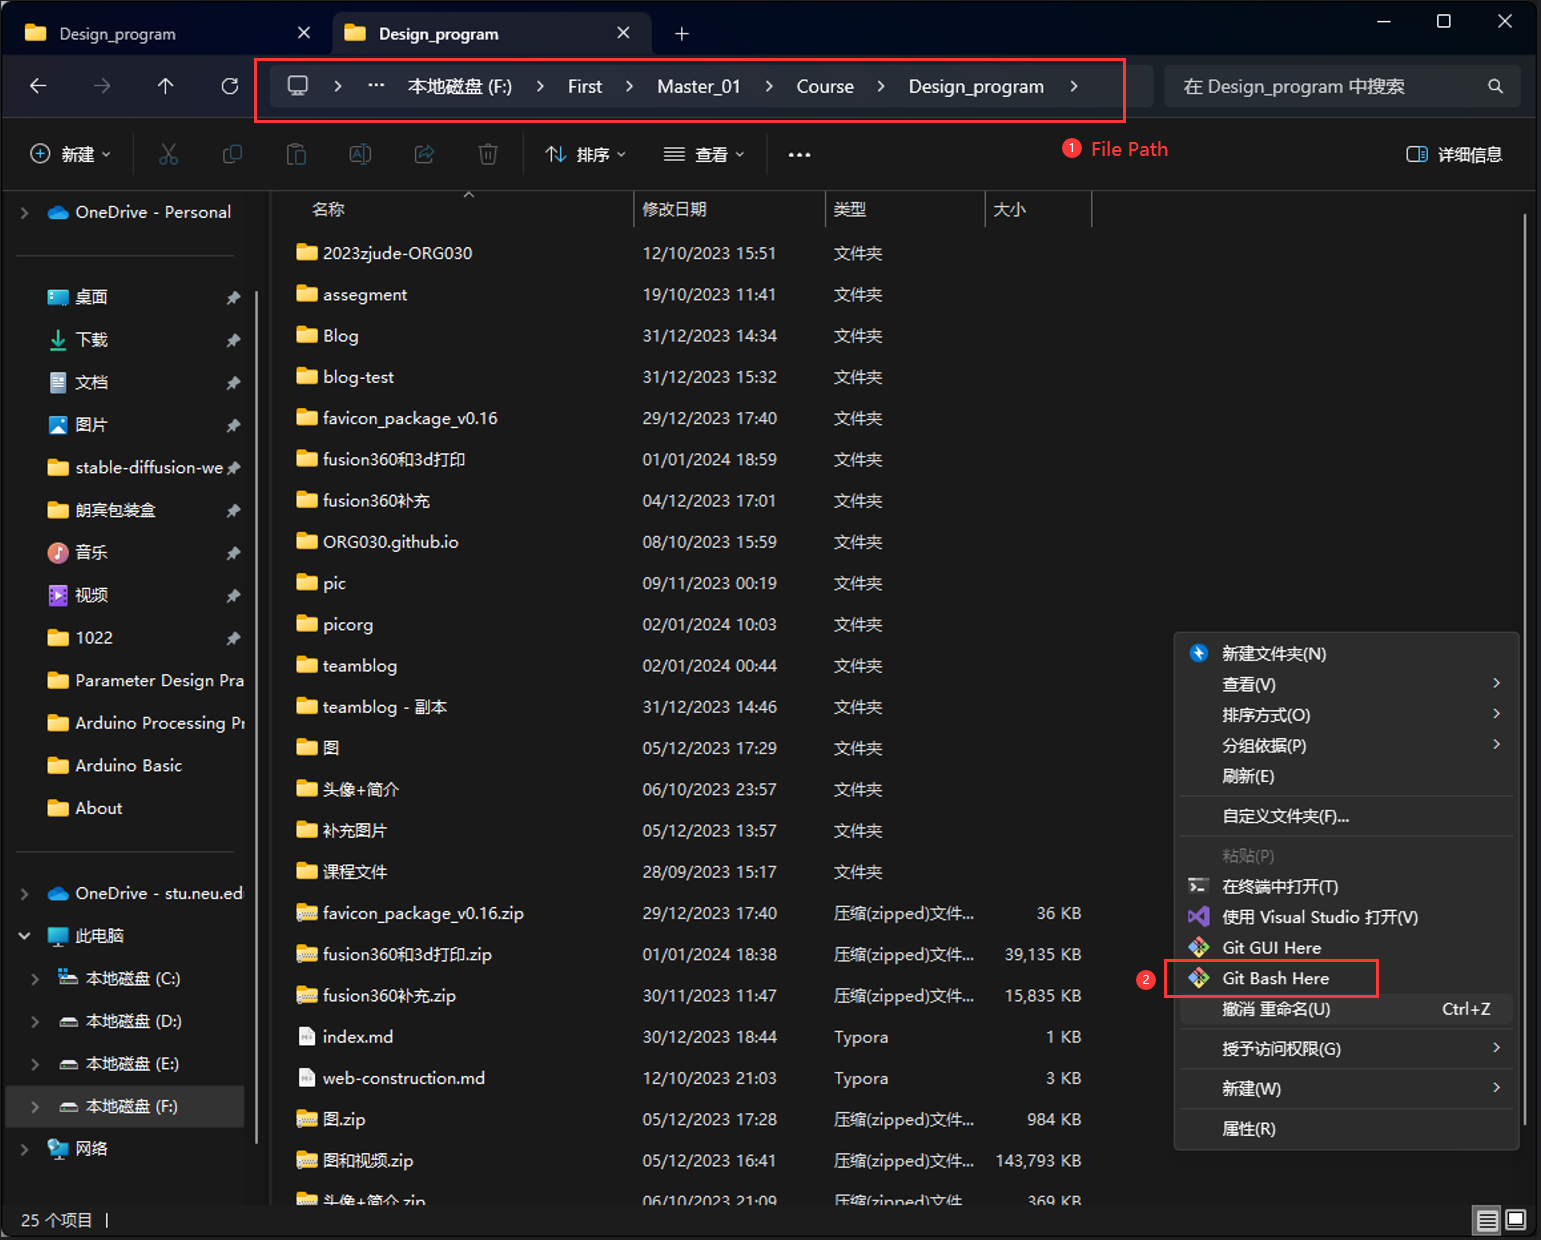
To install hexo yourself, enter the following at the command line
1 | npm install -g hexo-cli |

After the run is over, type hexo -v to view the version.

Initialization
- 安装Hexo完成后,继续在命令行中执行下列命令,Hexo将会在指定文件夹
<folder>中新建所需要的文件,folder可以自定义命名,这就是在本地的博客存储文件夹。
1 | hexo init <folder> |

新建完成后,<folder>的目录如下:
1 | . |
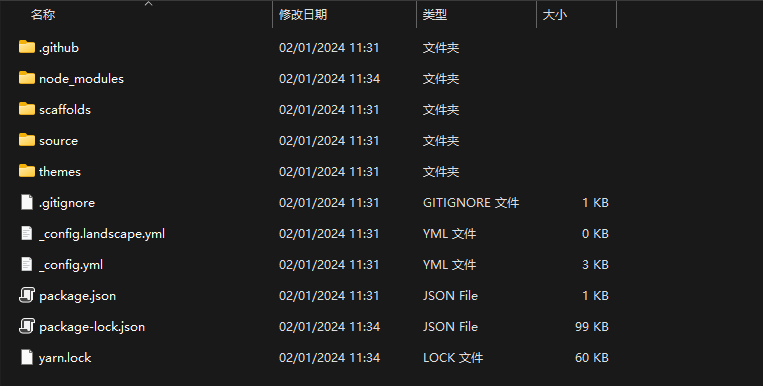
you will see the following content in the folder:
- node_modules: Dependency packages
- public: Stores generated pages
- scaffolds: Some templates for generating articles
- source: To store your articles
- themes: Themes
- _config.yml: Blog configuration file
The hexo commands are run in Git Bash from the site directory.
Site configuration file: _config.yml in the site directory. The path is <folder>\_config.yml
Theme configuration file: _config.yml under themes folder in site directory. The path is <folder>\themes\<Theme folder>\_config.yml
- Modify the site configuration file. The following information is in the site configuration file, and the specific content is modified according to the team’s own situation.
| 参数 | 描述 |
|---|---|
| title | Website title |
| subtitle | Website subtitle |
| description | Website Description |
| keywords | Keywords of the website. Use a half-comma to separate multiple keywords. |
| author | Your name |
| language | The language of the website is zh-CN in simplified Chinese and en in English |
| timezone | Site time zone. Hexo uses your computer’s timezone by default. List of time zones For example: America/New_York, Japan, and UTC. |
| url | Web address |
| root | Site root |
| permalink | Permalink format for articles,The default value is:year/:month/:day/:title/ |
| permalink_defaults | Default values for the sections in the permalink |
| pretty_urls | Override permalink values to beautify urls |
| pretty_urls.trailing_index | Whether or not to leave the trailing index.html in the permalink, if false, to remove |
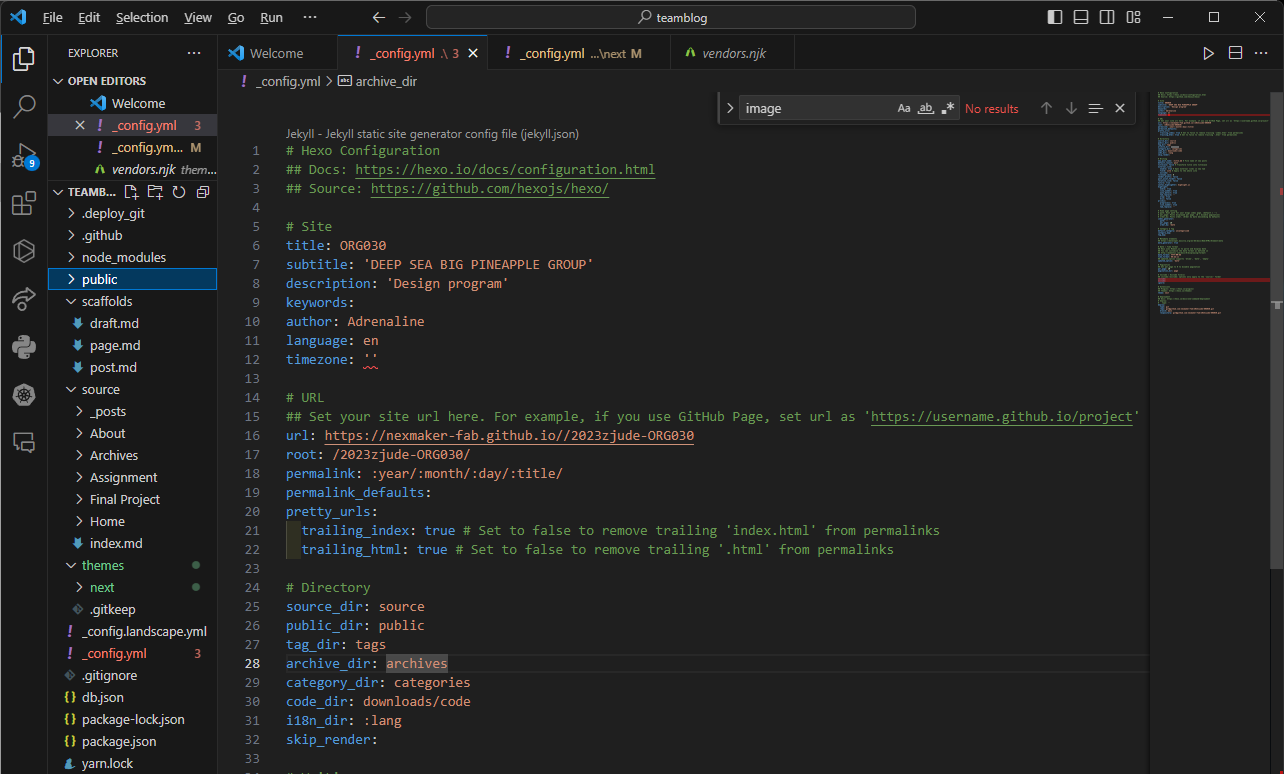
- 保存上述设置,Then enter the following commands in the command line to start locally
1 | hexo clean |
With this, the task creation is completed, enter
localhost:4000in the browser to see your blog interface.In the command line
ctrl + ccan shut down the service.

GitHub Repository Preparation
Creating a Repository
On the GitHub website:
https://github.com/, Register a GitHub account.Click on
New repositoryto create a new repository, set the name of the repository, make it visible toPublicso that it is accessible to Internet users, and create a Readme.md document that explains the entire project (optional). Since we are part of the NexMaker-Fab organization, the Owner in the image corresponds to our project:Owner:NexMaker-Fab
Repository name:ORG030
![]()
Go to the GitHub Page of the repo and first go to the
Settingsscreen of the repo. In thePagessection, select the main source branch, usually namedmain, and specify the folder asrootbefore saving preferences, which is important for indexing and deployment of the web page. Note that you may need to adjust this setting at a later time. After saving these Settings, you will receive a link to your repository. Usually the name will be the default Page page displayhttps://github.com/<Github account name>/<Github account name>/![]()
SSH Binding
- Enter the following command in Git Bash, where yourname is your GitHub username and youremail is your GitHub email.
1 | git config --global user.name "yourname" |
- Create an SSH key, continue with enter, then you can view the public key by typing
cat id_rsa.pub.
1 | ssh-keygen -t rsa -C "youremail" |
In GitHub’s settings, set up SSH keys by copying the information into it.
Enter the following command in Git Bash to check if SSH is bound successfully.
1 | ssh -T git@github.com |
Deploying Hexo to GitHub
- Open the site configuration file
_config.ymlin the folder, scroll to the end, and modify the following:
1 | deploy: |
- Install
hexo-deployer-git, just run the following command from the command line (Git Bash) :
1 | npm install hexo-deployer-git --save |

- Deploy. Push to GithubPages. From the command line (Git Bash), type the following commands to return INFO Deploy done: git was successfully pushed:
1 | hexo g |
or
1 | hexo g -d |
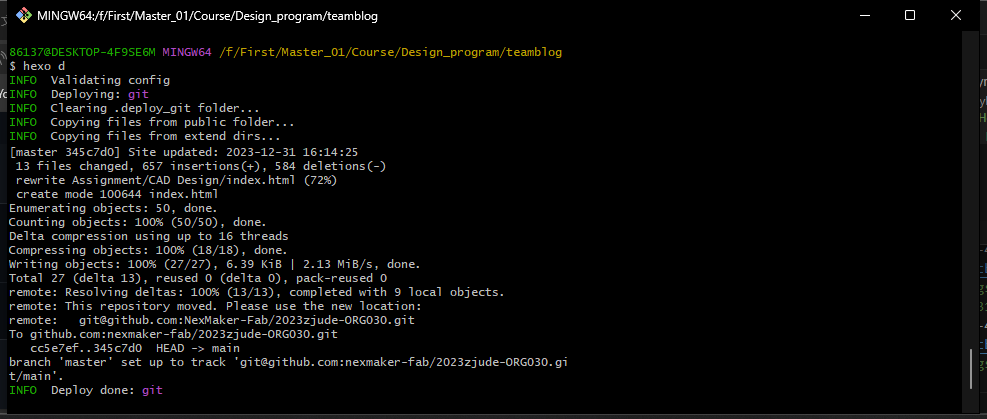
- After successful deployment, view your blog at
https://github.com/<Github account name>/<Github account name>.
Theme
The default theme for Hexo is landscape, so choose a theme you like and download it.
We choose to use Next. For the official documentation, please click here: Documentation | NexT (theme-next.js.org)
Application themes
- Paste the downloaded themes folder under
themesfile in the site directory,or load it withgit clonefrom the command line in the themes folder.

- Change the theme field of the site configuration file
_config.ymlto the name of the theme folder:
1 | # Extensions |
Theme optimization
A lot of the functionality is already provided in the Next theme configuration file, so you only need to modify it slightly when you need it.
Set the site establishment time
- Open
themes/next/_config.ymland look for since (the default is the current year) :
1 | footer: |
Set the theme style
- Open
themes/next/_config.yml, look for Schemes and choose a different theme style according to your personal preference. Remove the previous comment “#” to apply the style.
1 |
|
Set the code highlight theme
- You can format the code in the highlight field of the site configuration file:
1 | highlight: |
- Change the
highlight_themefield in the theme configuration file to match your favourite highlighting style,copy_button.styleallows you to style the copy button for your code block, for example:

Set the rounded border of the text box
- In the directory
\themes\next\source\css\_variables, open the corresponding file according to the theme style of your choice and change the relevant parameters:
1 | // $border-radius-inner = initial; |
Set plate transparency
- Open themes
\next\source\css\_schemesdirectory, according to the theme style of your choice, go to the corresponding directory, open the files of the corresponding section, and change the background parameter:
1 | background: rgba(255,255,255,0.6); //0.6 is transparency, modifiable |
Set the avatar and favicon
- Open
themes/next/_config.ymland look foravatar

- Open
themes/next/_config.ymland look forfavicon

Setting up Index.hmtl
Enter the following in the command terminal
1 | hexo g |
After successful initialization, you should see a public file created in the directory containing index.html, and each interface should have an index.html input file.
There are links to some css files for the site theme, and some links to fonts. In this html file in the root directory, we set our home page, which is the default index.html. We can indirectly change this Index.html by changing the relevant Settings file under the Next theme.

The full Index.html looks like this:
1 |
|
Preview
Each time you make a change to your styles, you can use
1 | hexo s |
to preview the site’s styles locally and make adjustments.
Please refer to the official documentation for more Settings: Documentation | NexT (theme-next.js.org)
Write A Document
- Because the article is displayed according to Tags and Categories under the Next theme, it does not quite meet the requirements of the hierarchical display I need. So I used a subdirectory page to create the post.
- To create a new page, start a command line in the source directory of the file and enter the following, the creation of a custom interface is complete.
1 | Hexo new page "Page Name" |
- At the same time, hexo NexT will create the corresponding folders and
index.mdfile in the Source directory, one Markdown file for each page. Or directly create afolderandindex.mddocument in the directory, and modify theFront-matterof the document as needed. You also need to change the Menu hierarchy, name, and identity icon in the theme’s_config.ymlfile. ![]()
- The
Front-matterin the document contains thetitle,dateand other information of the document, which can be modified according to the display requirements. - MarkDown Document used for creation, its syntax can refer to the official Document: MarkDown basic grammar | MarkDown official tutorial
- using this command to upload to github
1 | hexo g -d |
Web Image Resource Management
Use the Github repository as the graph bed for the article.
Create a repository, give a name, recommended with img for easy identification.
Make sure the repository permissions are Public; everything else can be left as default.

Find a local folder location and git clone the repository.
1 | git clone https://github.com/ORG030/picorg.git |
In the repository folder to place the required images, you can also create the corresponding subfolder, convenient classification.
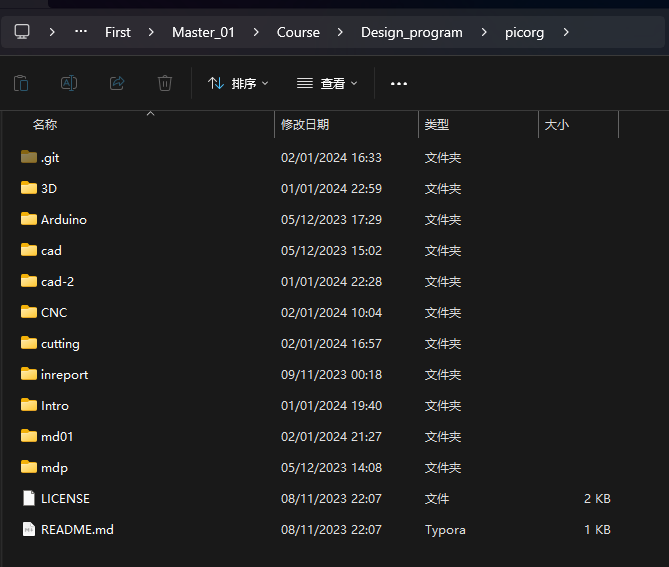
Before you need to deploy the updates to GithubPage, open a Git Bash command line in the image repository and type one after another.
1 | git clone |

All images will be uploaded to this GitHub repository. Enter the warehouse, right click on the specified picture, you can choose to copy the picture address, use html grammar in Markdown, insert the picture address just copied, you can complete the picture placement, the parameters can be modified according to html grammar and the actual Web page in the mixed layout of the picture parameters.
1 | <img src="Image address" |
Other Issues
Insert gif images into the Document
The gif insertion logic is the same as the image insertion logic, also using the Github repository as the diagram bed. And use html syntax for insertion.
Insert a video into the article
First upload the video in the b station, here you can refer to the b station tutorial: https://www.bilibili.com/video/BV1B4411R7Yi/?vd_source=777f38179a6966234c29f2bc091bee8a
After the video is published, go to the video interface and select the Share button,Click Embed Code to get the html link for the video.

Use the html <div> to create a layout, frame the entire video inside it, set its parameters, place it in the right place on the page, unautoplay the video, etc.
1 | <div style="position: relative; padding-bottom: 75%; height: 0; overflow: hidden;"> |

