IOT Internet of Things
IOT 开发板
关于物联网开发板,主要指有WiFi与蓝牙功能的开发板。虽然部分开发板并没有Wifi功能,也可以增加WiFi模块来实现联网功能。市面上主要有Arduino 我、esp8266、esp32、树莓派、树莓派zero w等。
现在比较常见的就是乐鑫的esp32系列,例如小米的智能插座,就使用的乐鑫的esp32方案。

物联网平台
Arduino现在已经推出官方的云平台Arduino IOT cloud,国内也有比如阿里云IOT、腾讯云等平台。

阿里云IOT上传数据
首先我们需要安装依赖库。
#include <ArduinoJson.h>
#include <aliyun_mqtt.h>
#include <WiFi.h>ArduinoJson用来解析云端数据,mqtt包括与aliyun数据传输的函数。WiFi.h为自带库。
注意在使用platformIO编译时,可能会出现依赖问题。如下图。
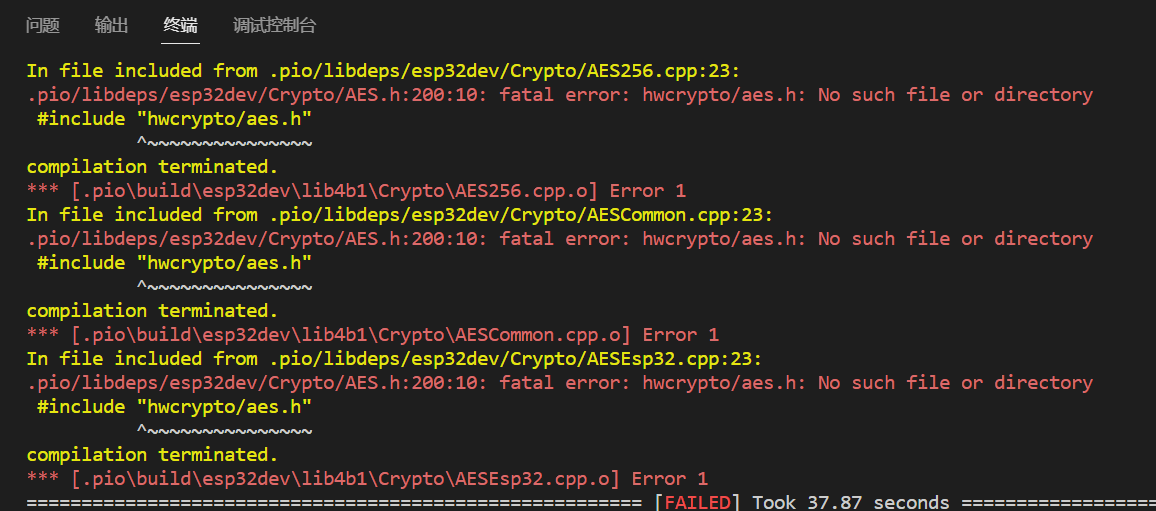
在安装aliyun_mqtt库时,也会安装Crypto与PubSubClient库,如果没有,可以自行安装。如果相关依赖缺失,可以先查找是否是没有安装相关依赖,如果没有搜到相关依赖库,可以在Google搜索,搜索后我们发现,hwcrypto/aes.h是ESP-IDF默认的库,可能是版本问题,在esp官方GitHub中并没有发现,在其他fork中发现该依赖。我们可以下载代码,将ase.h文件拷贝到platformIO项目的依赖文件夹中。
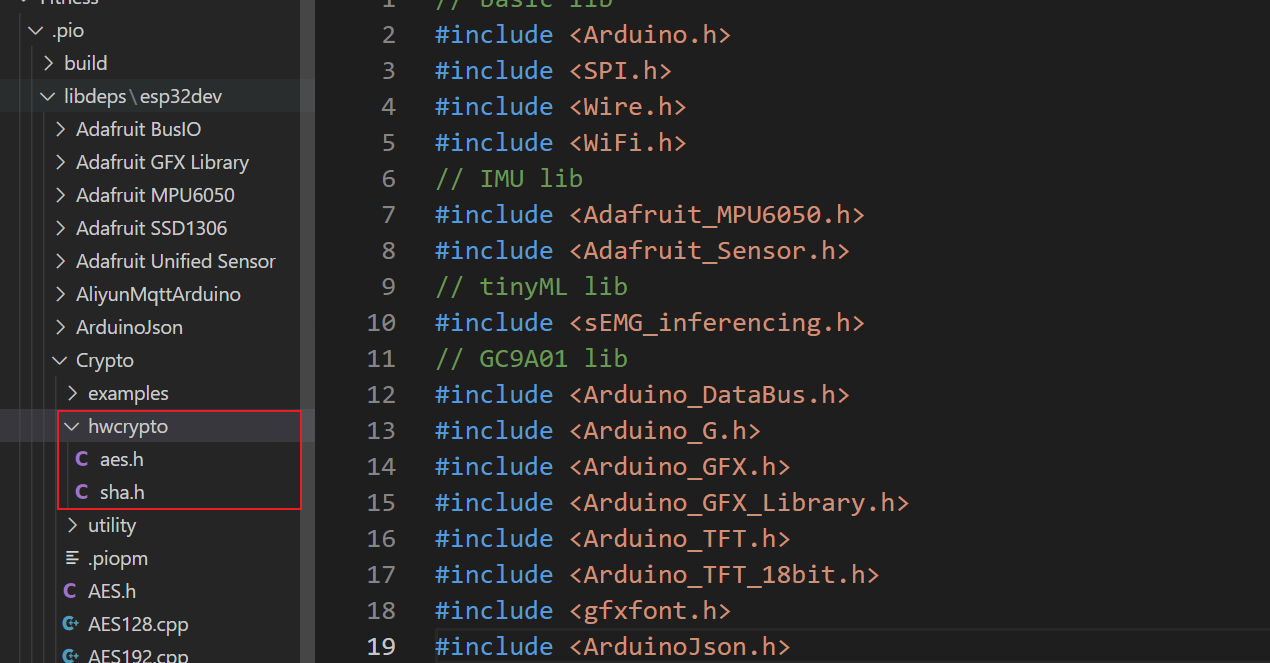
编译通过。

在阿里云中,我们需要新建一个实例,具体操作可以参考nexmaker网站教程。在获得相关密钥后,复制粘贴到下列代码中。
#define PRODUCT_KEY "x"                        // 1.exchange  PRODUCT_KEY
#define DEVICE_NAME "x"                              // 2.exchange  DEVICE_NAME
#define DEVICE_SECRET "x" // 3.exchange DEVICE_SECRET
#define WIFI_SSID "x"                             // 4.exchange WIFI
#define WIFI_PASSWD "x"                          // 5.exchange WIFI password
#define ALINK_BODY_FORMAT "{\"id\":\"%u\",\"version\":\"1.0\",\"method\":\"%s\",\"params\":%s}"
#define ALINK_TOPIC_PROP_POST "/sys/" PRODUCT_KEY "/" DEVICE_NAME "/thing/event/property/post"
#define ALINK_TOPIC_PROP_SET "/sys/" PRODUCT_KEY "/" DEVICE_NAME "/thing/service/property/set"
#define ALINK_METHOD_PROP_POST "thing.event.property.post"
现在我们需要将数据上传到云端。下列是上传函数
void mqttPublish(int n)
{
  if (mqttClient.connected())
  {
    //先拼接出json字符串
    char param[32];
    char jsonBuf[128];
    sprintf(param, "{\"Counting\":%d}", n); //我们把要上传的数据写在param里
    postMsgId += 1;
    sprintf(jsonBuf, ALINK_BODY_FORMAT, postMsgId, ALINK_METHOD_PROP_POST, param);
    //再从mqtt客户端中发布post消息
    if (mqttClient.publish(ALINK_TOPIC_PROP_POST, jsonBuf))
    {
      Serial.print("Post message to cloud: ");
      Serial.println(jsonBuf);
    }
    else
    {
      Serial.println("Publish message to cloud failed!");
    }
  }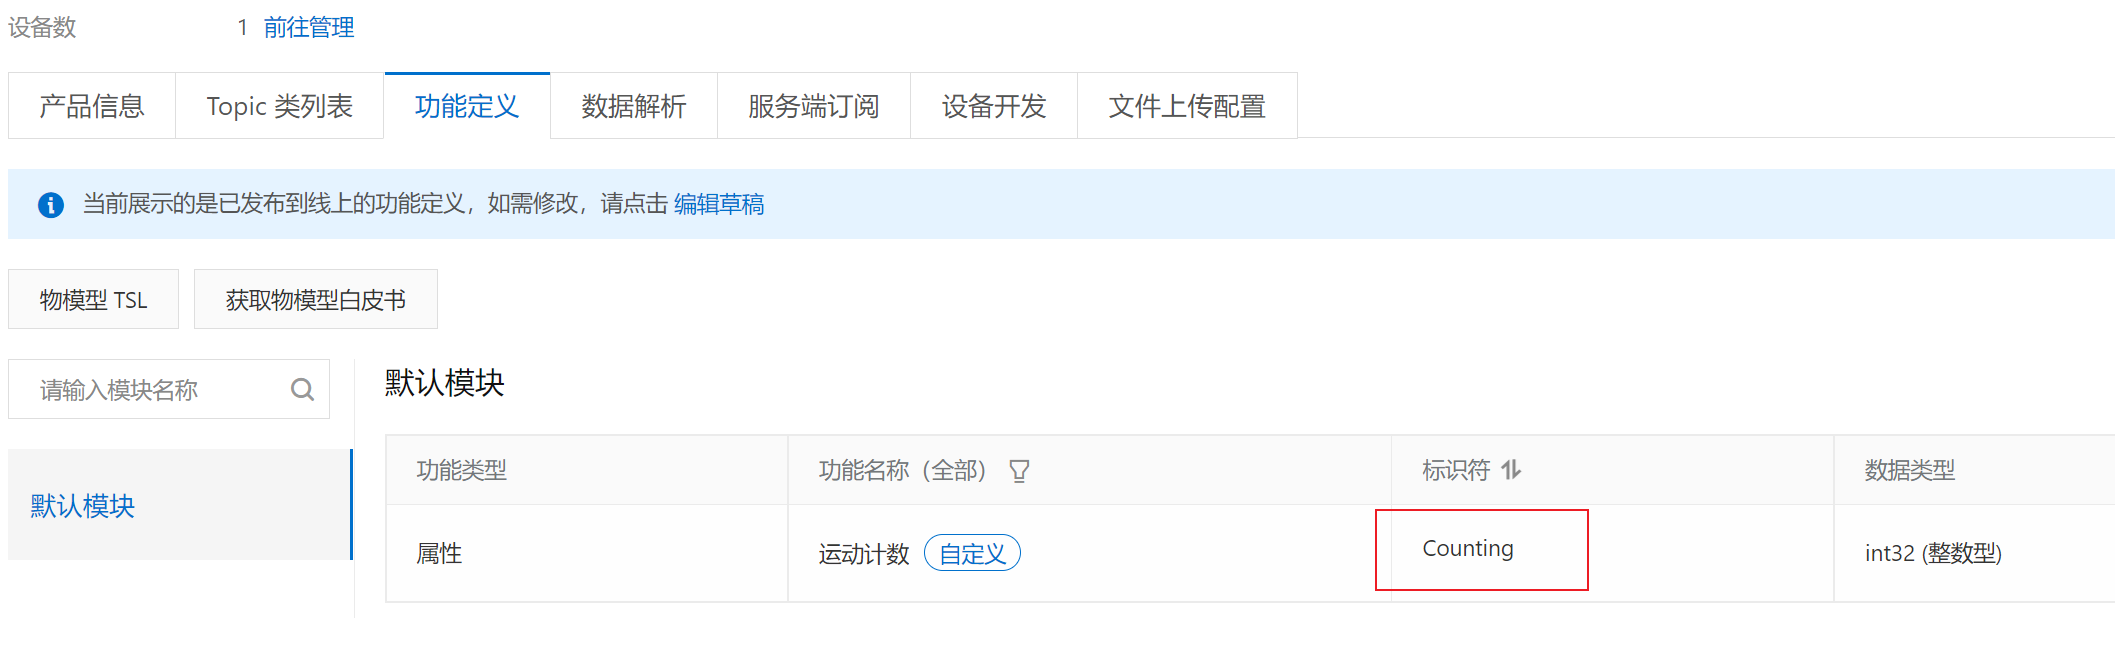
}注意,在第八行的sprintf(param, "{\"Counting\":%d}", n);的Counting,需要是你在功能定义中的标识符。在这里,我们先将运动计数上传。
引入库与函数后,在setup函数中,我们用WiFi.begin(WIFI_SSID, WIFI_PASSWD)连接wifi,用connectAliyunMQTT(mqttClient, PRODUCT_KEY, DEVICE_NAME, DEVICE_SECRET)连接阿里云。
WiFiClient espClient; //创建网络连接客户端
PubSubClient mqttClient(espClient); //通过网络客户端连接创建mqtt连接客户端
void setup()
{
WiFi.begin(WIFI_SSID, WIFI_PASSWD);
while (WiFi.status() != WL_CONNECTED)
{
delay(500);
}
Serial.println(WiFi.localIP());
if (connectAliyunMQTT(mqttClient, PRODUCT_KEY, DEVICE_NAME, DEVICE_SECRET))
{
Serial.println("aliyun connected");
}
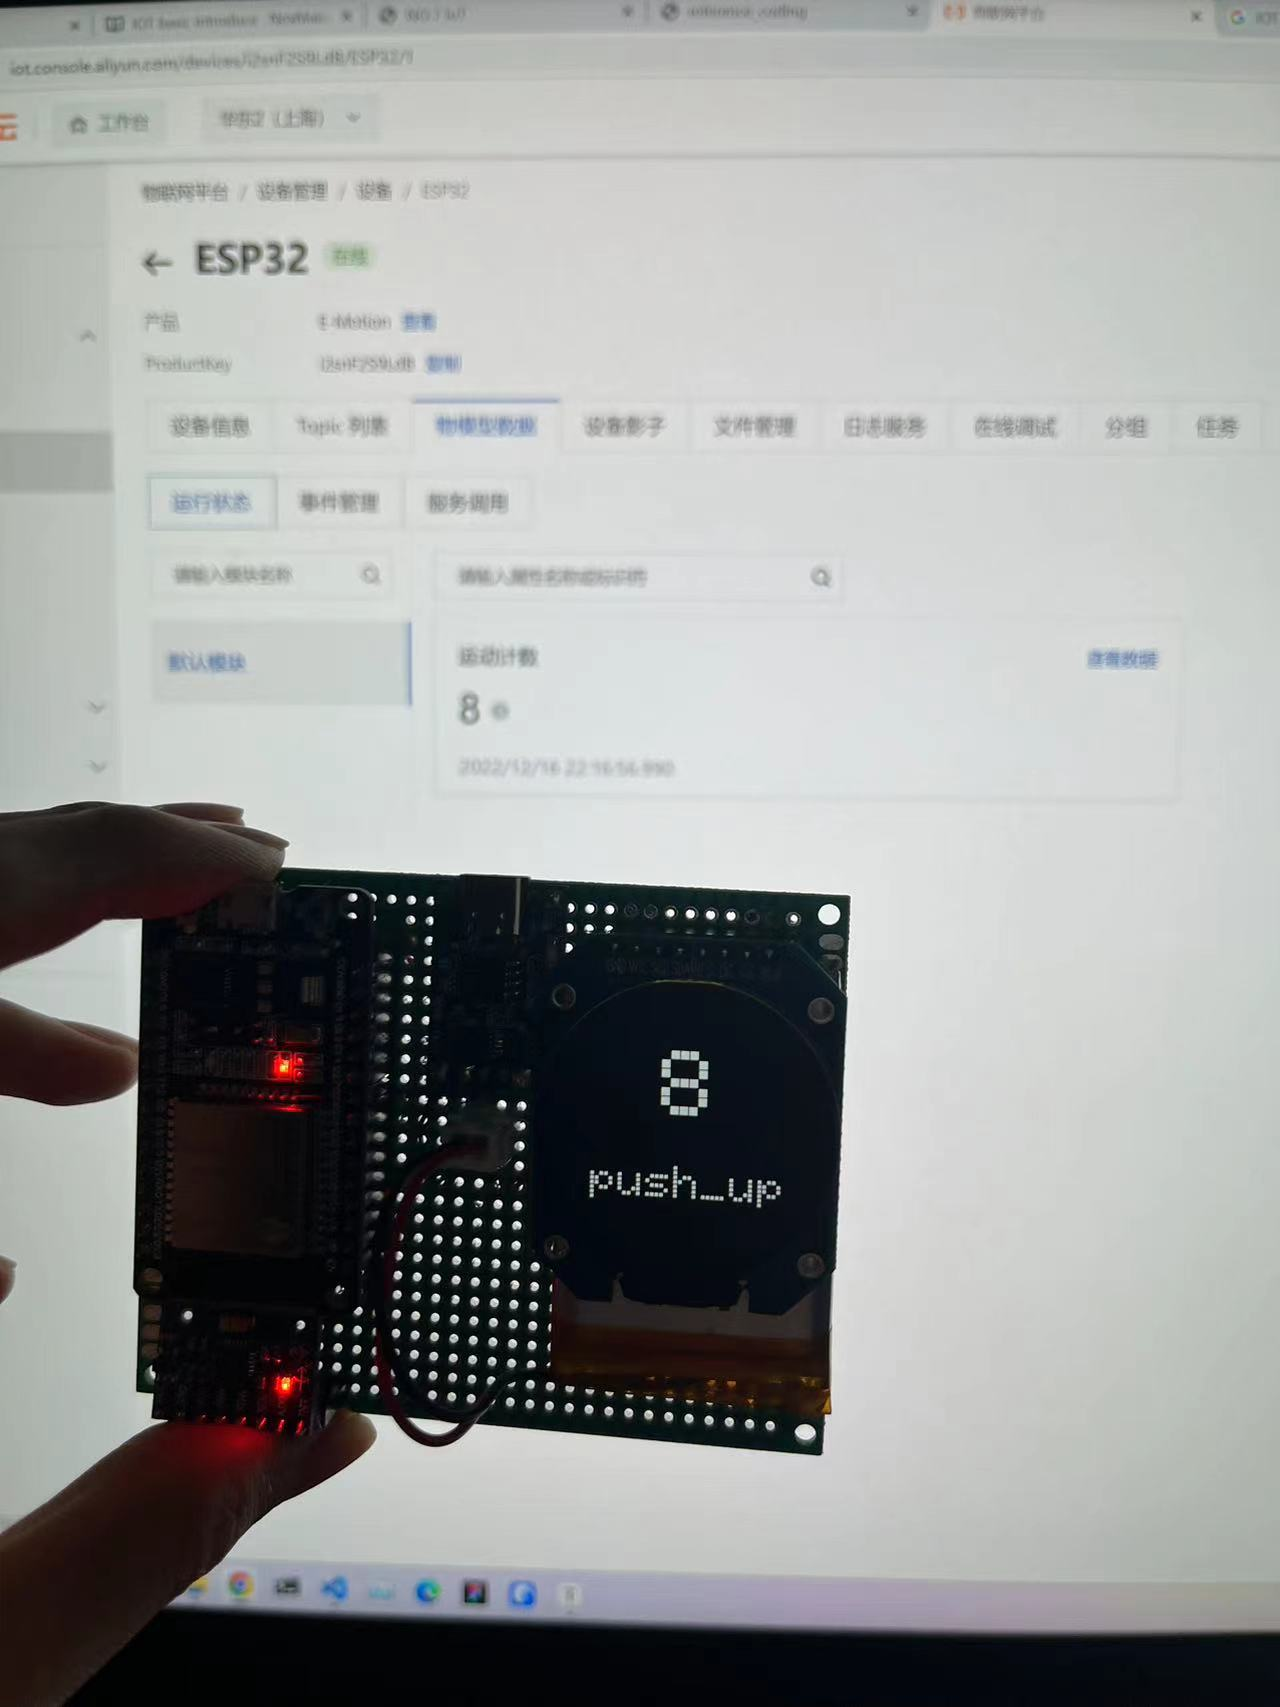
}在loop函数中,我们用训练好的模型生成预测结果,如果分数大于阈值,则count+1,并将其上传到云端。
void loop()
{

    ei_impulse_result_t result = {0};
    prediction(&result);
    for (size_t ix = 0; ix < EI_CLASSIFIER_LABEL_COUNT; ix++)
    {
        if (result.classification[ix].value > threshold)
        {
            String label = result.classification[ix].label;
            if (result.classification[ix].label == "rest")
            {
                trainmode = "Rest";
            }
            else if (trainmode == "None")
            {
                trainmode = result.classification[ix].label;
            }
            else if (label == trainmode)
            {
                allcount[ix] = allcount[ix] + 1;
                trainmodecount = trainmodecount + 1;
                mqttPublish(trainmodecount);//将计数上传云端
            }
            else
            {
                allcount[ix] = allcount[ix] + 1;
            }
        }
    }
    for (size_t ix = 0; ix < EI_CLASSIFIER_LABEL_COUNT; ix++)
    {
        if (allcount[ix] > 3)
        {
            if (trainmode != result.classification[ix].label)
            {
                trainmode = result.classification[ix].label;
                trainmodecount = allcount[ix];
            }
        }
    }

    mqttClient.loop();
}
云端控制
TBA
参考
— Dec 16, 2022
Search
Made with ❤ and at ZJU.