Arduino Application
About Open Source Hardware

“Open hardware,” or “open source hardware,” refers to the design specifications of a physical object which are licensed in such a way that said object can be studied, modified, created, and distributed by anyone.
About Arduino
Arduino(/ɑːrˈdwiːnoʊ/) is an open-source hardware and software company, project, and user community that designs and manufactures single-board microcontrollers and microcontroller kits for building digital devices.
Learn more about Arduino and its history, visit Arduino wikipedia.
About Arduino Uno
The Arduino UNO is the best board to get started with electronics and coding. If this is your first experience tinkering with the platform, the UNO is the most robust board you can start playing with. The UNO is the most used and documented board of the whole Arduino family.
Arduino UNO is a microcontroller board based on the ATmega328P. It has 14 digital input/output pins (of which 6 can be used as PWM outputs), 6 analog inputs, a 16 MHz ceramic resonator, a USB connection, a power jack, an ICSP header and a reset button. It contains everything needed to support the microcontroller; simply connect it to a computer with a USB cable or power it with a AC-to-DC adapter or battery to get started. You can tinker with your UNO without worrying too much about doing something wrong, worst case scenario you can replace the chip for a few dollars and start over again.
Here is Arduino Uno docs.

Arduino with LCD Screen
LCD1602, or 1602 character-type liquid crystal display, is a kind of dot matrix module to show letters, numbers, and characters and so on. It’s composed of 5x7 or 5x11 dot matrix positions; each position can display one character. There’s a dot pitch between two characters and a space between lines, thus separating characters and lines. The model 1602 means it displays 2 lines of 16 characters.

Pins spec is following.

In this section, we will use LCD and Arduino to display some letters and scroll round and round.
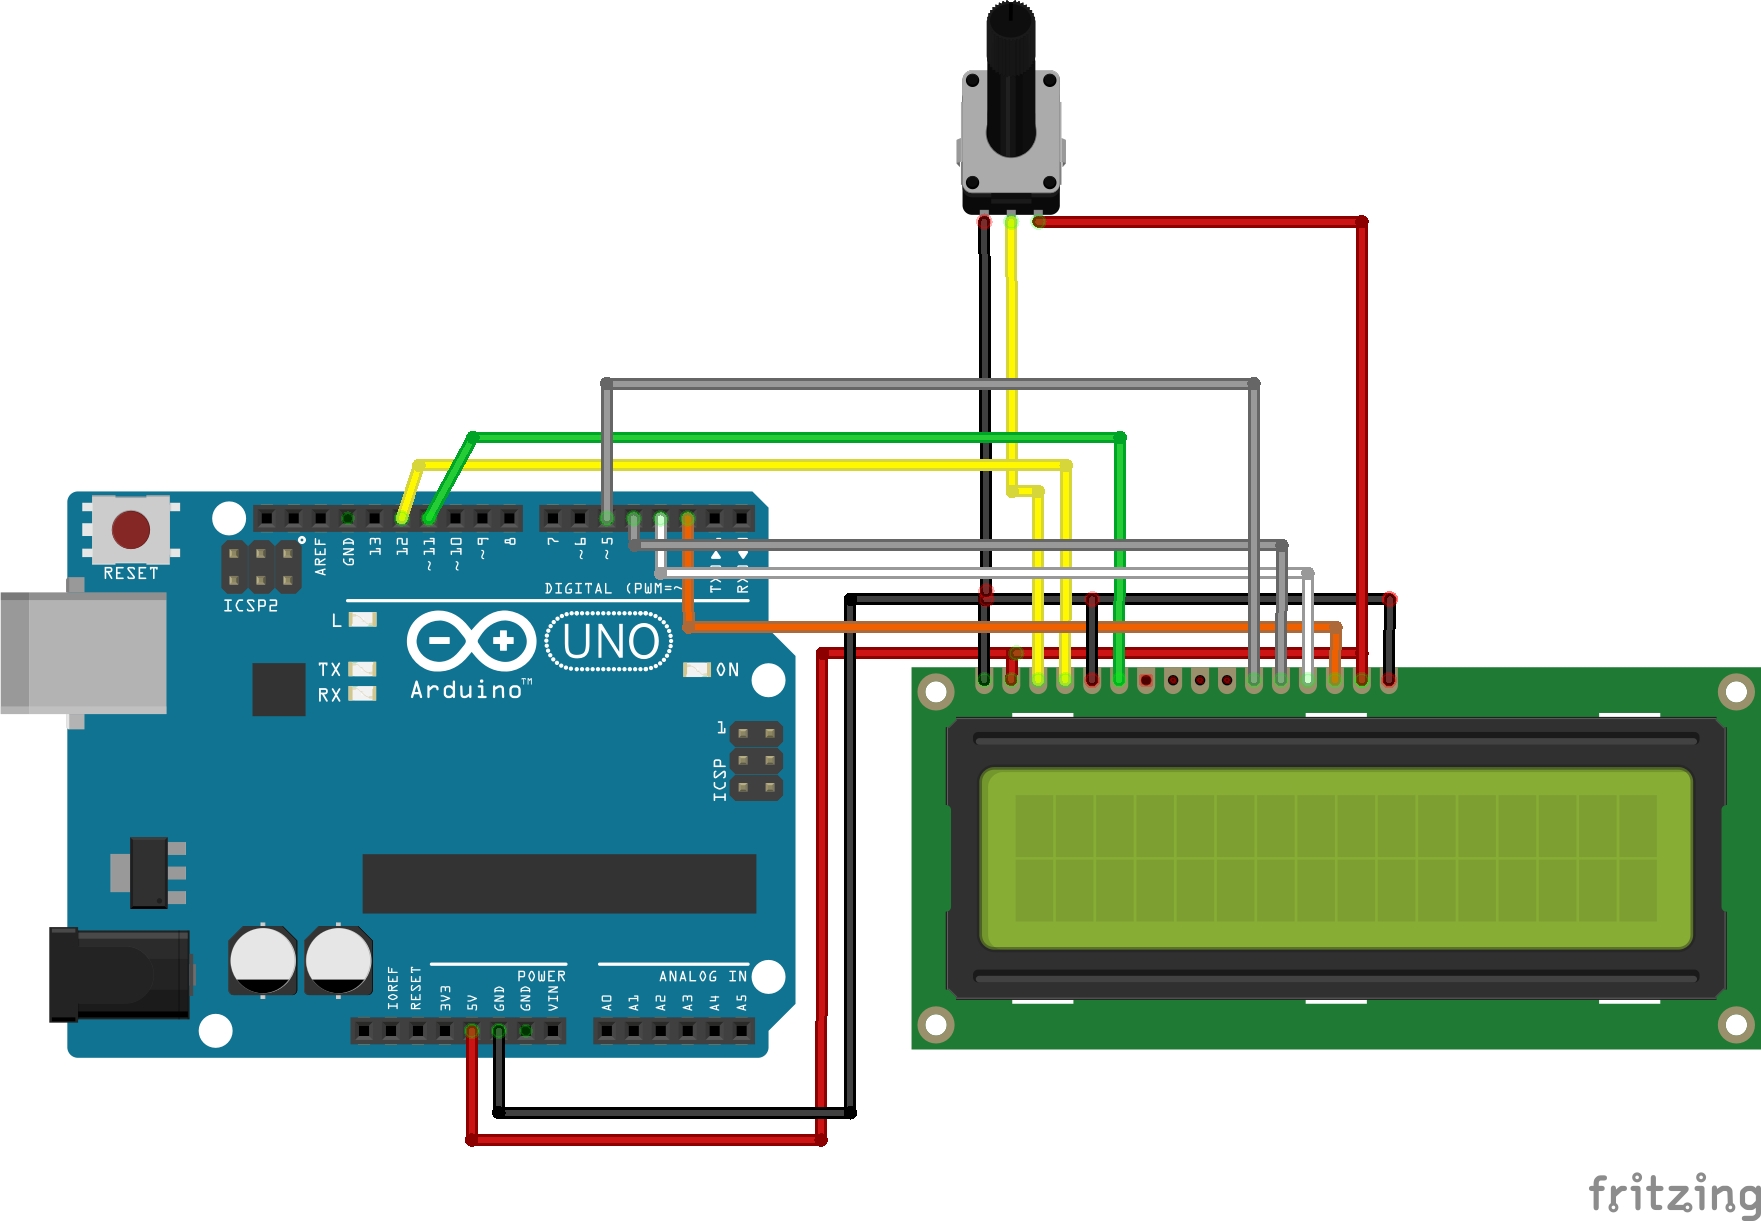
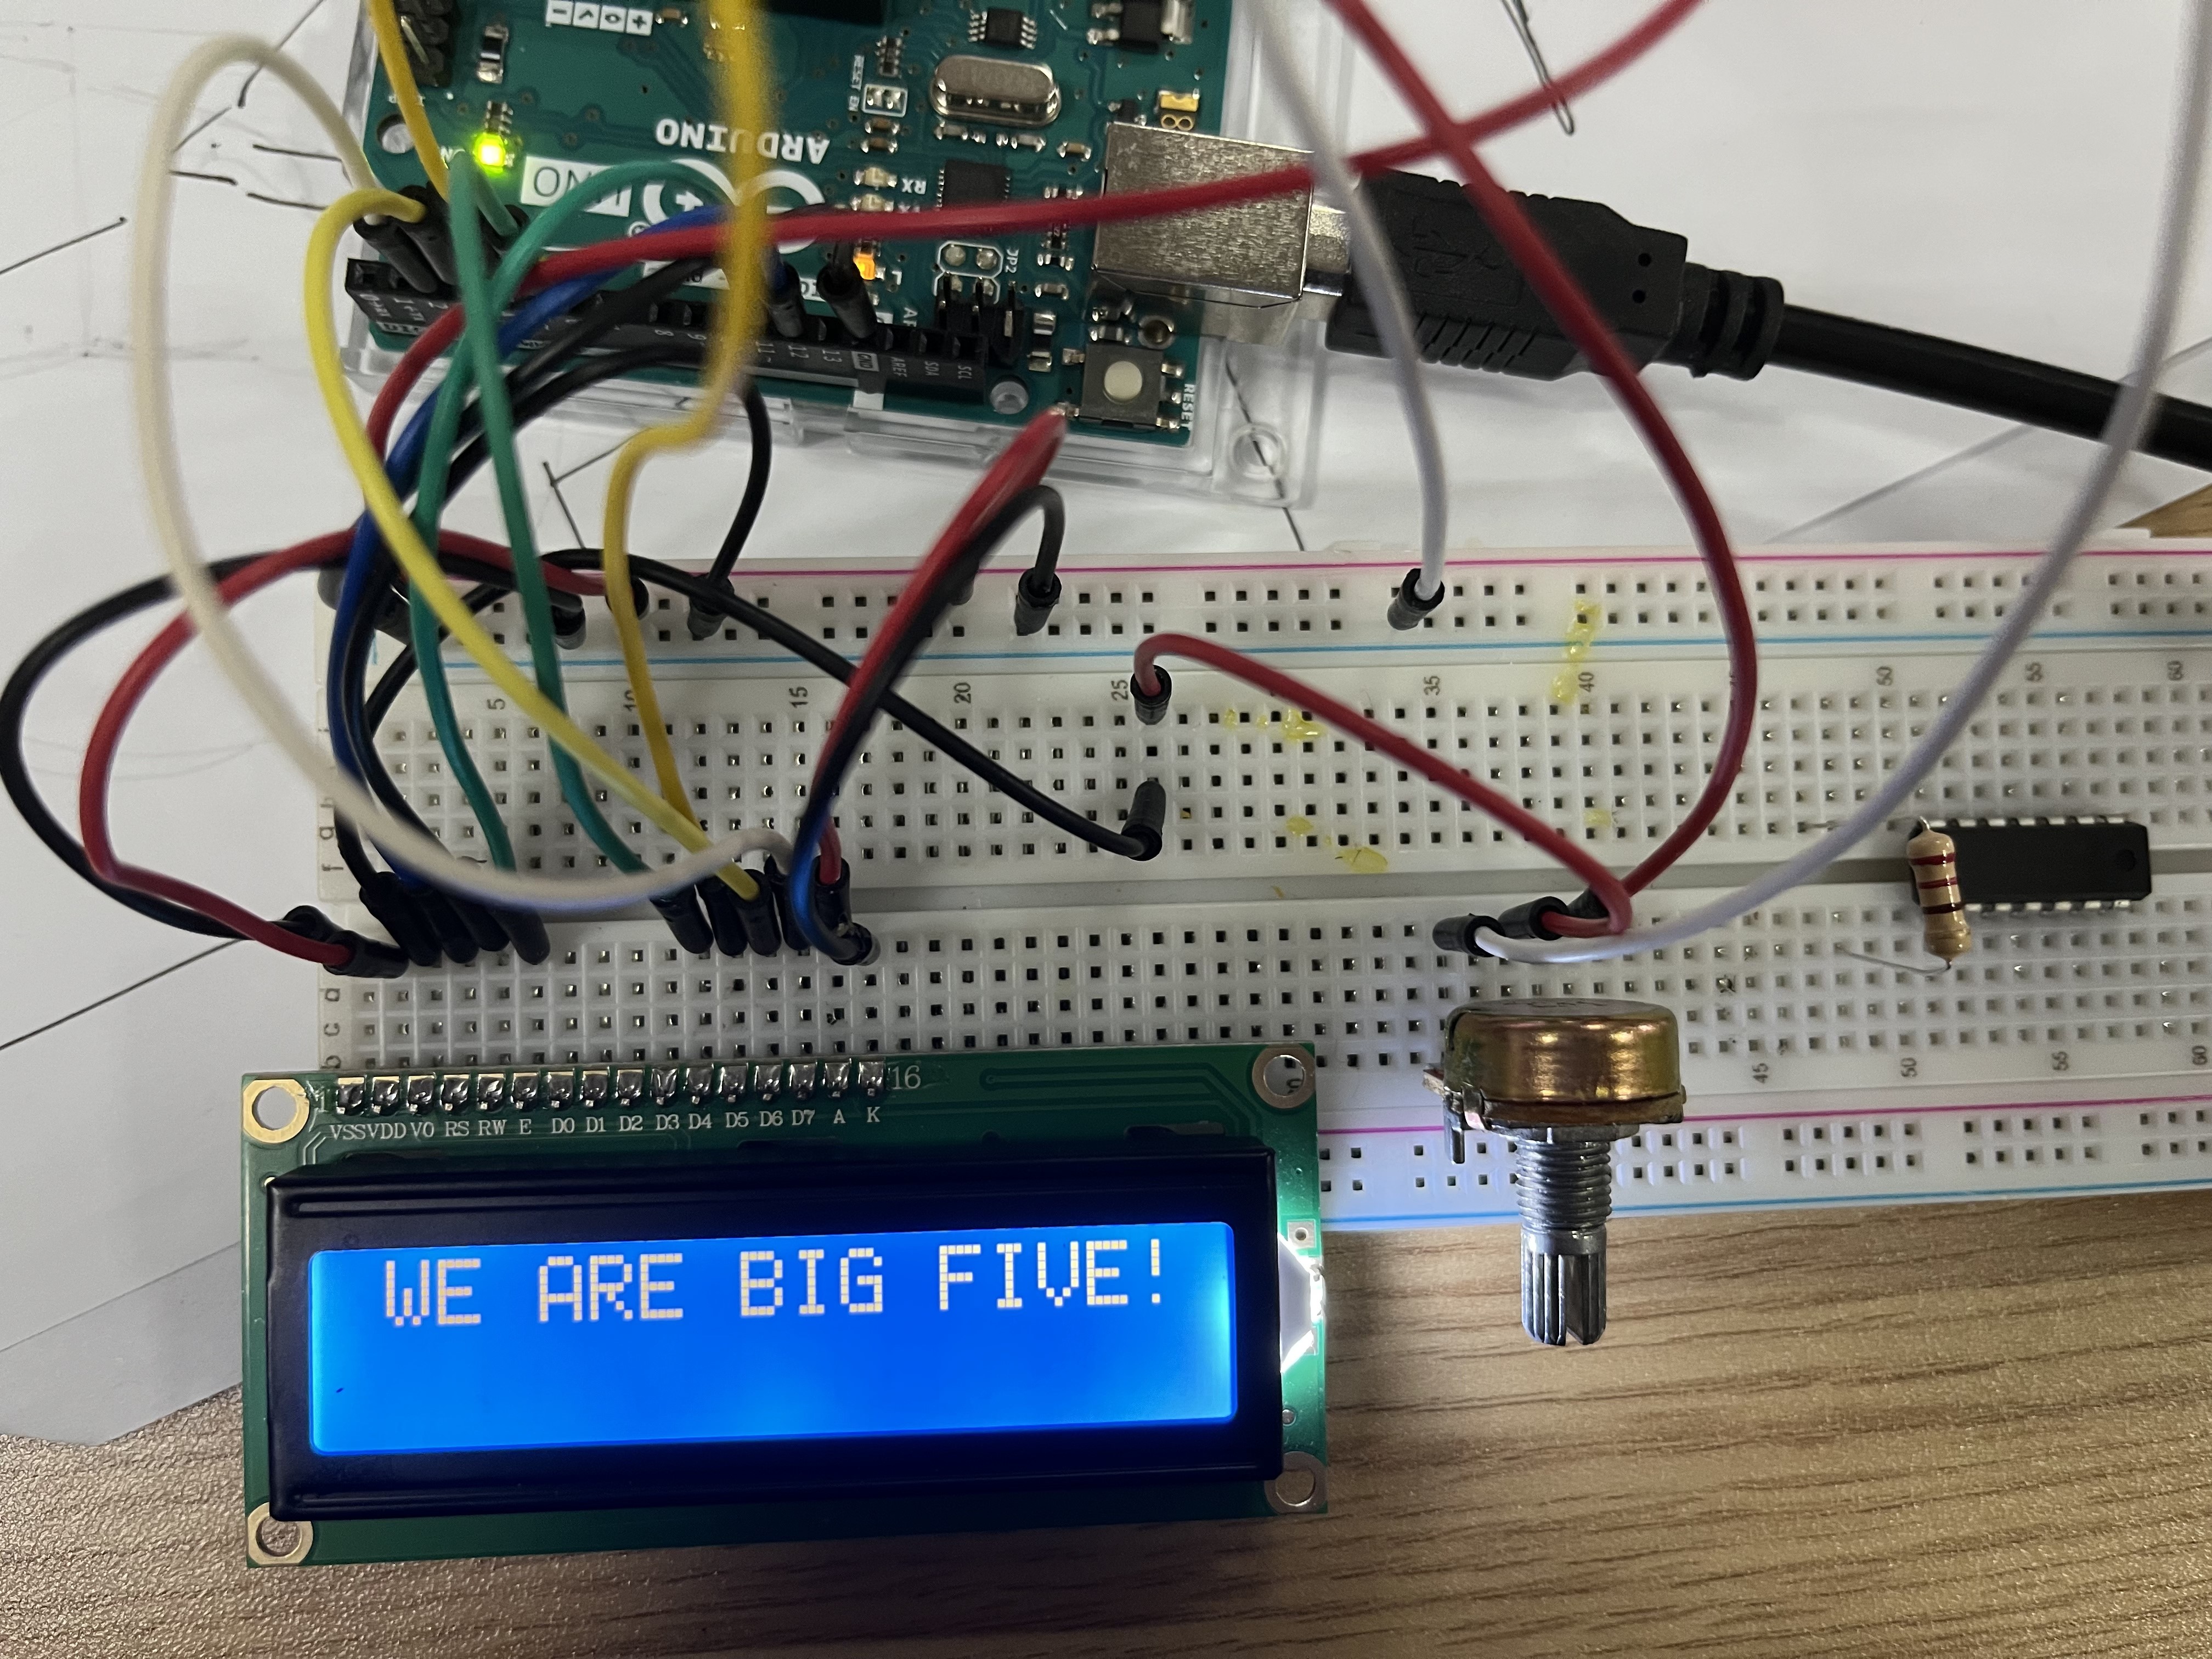
- Connect uno and LCD as the following picture. The potentiometer is to tune screen contrast.

Install
LiquidCrystal Library. Commonly, the lib is installed by default with Arduino IDE.Upload the code below.
#include<LiquidCrystal.h>

// 创建lcd控制对象,并指定其引脚与Arduino控制板对应关系
const int rs=12,en=11,d4=5,d5=4,d6=3,d7=2;
LiquidCrystal lcd(rs,en,d4,d5,d6,d7);

void setup()
{
  lcd.begin(16,2);
  lcd.print("WE ARE BIG FIVE!");
}

void loop() {

}
lcd.begin(16,2); is to initializes the interface to the LCD screen, and specifies the dimensions (width and height) of the display. begin() needs to be called before any other LCD library commands.
lcd.print("WE ARE BIG FIVE!"); is to prints text to the LCD.


- Then, upload the code blow.
#include <LiquidCrystal.h>

// 创建lcd控制对象,并指定其引脚与Arduino控制板对应关系
const int rs = 12, en = 11, d4 = 5, d5 = 4, d6 = 3, d7 = 2;
LiquidCrystal lcd(rs, en, d4, d5, d6, d7);

void setup()
{
  // lcd初始化,同时设置lcd屏幕的列数和行数(宽和高)
  lcd.begin(16, 2);
  //   向LCD打印"hello, world!"
  lcd.print("WE ARE BIG FIVE!");
}

void loop()
{
  //向左滚动15个位置(即字符串长度)
  //将其向屏幕外移动:
  for (int positionCounter = 0; positionCounter < 15; positionCounter++) {
    // 向左滚动一格
    lcd.scrollDisplayLeft();
    //延时150毫秒
    delay(500);
  }

  // 向右滚动31个位置(字符串长度15+显示长度16)
  // 向右滚动出屏幕
  for (int positionCounter = 0; positionCounter < 31; positionCounter++) {
    //滚动一格单位
    lcd.scrollDisplayRight();
    // 些许延时
    delay(500);
  }

  // 向左滚动15个位置(显示长度)
  // 移动回中心
  for (int positionCounter = 0; positionCounter < 15; positionCounter++) {
    // 向左滚动一格
    lcd.scrollDisplayLeft();
    // 稍微延迟以更好的显示效果
    delay(500);
  }

  // 在循环结束时延时
  delay(1000);
}
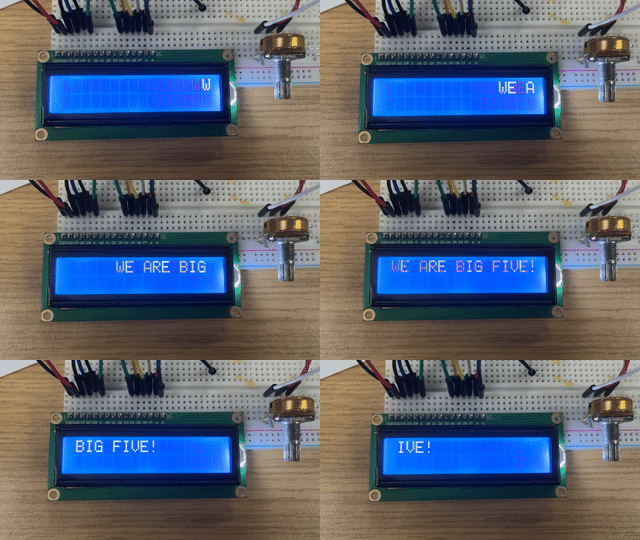
lcd.scrollDisplayRight(); and lcd.scrollDisplayLeft(); is to scroll the contents of the display (text and cursor) one space to the left/right.

Arduino with Input Sensor
DHT11 Temp&Humidity sensor

This project uses DHT sensor to detect temperature and humidity, you can visit this site to learn more about this sensor.

And before upload the code, you need to install the DHT library. In this project, the LCD wires connection are the same as above, only to attach the DHT pin as: VCC→5V, DATA→pin9, GND→GND.
#include<LiquidCrystal.h>
#include "DHT.h"

#define DHTTYPE DHT11

// 创建lcd控制对象,并指定其引脚与Arduino控制板对应关系
const int rs=12,en=11,d4=5,d5=4,d6=3,d7=2;
LiquidCrystal lcd(rs,en,d4,d5,d6,d7);

const int DHTPIN = 9;

DHT dht(DHTPIN, DHTTYPE);

void setup()
{
  lcd.begin(16,2);
//  lcd.print("DHT11");
  delay(100);
  lcd.clear();
  Serial.begin(9600);
//  Serial.println(F("DHTxx test!"));

  dht.begin();
}

void loop() {
    // Wait a few seconds between measurements.
  delay(2000);

  // Reading temperature or humidity takes about 250 milliseconds!
  // Sensor readings may also be up to 2 seconds 'old' (its a very slow sensor)
  float h = dht.readHumidity();
  // Read temperature as Celsius (the default)
  float t = dht.readTemperature();
  // Read temperature as Fahrenheit (isFahrenheit = true)
  float f = dht.readTemperature(true);

  // Check if any reads failed and exit early (to try again).
  if (isnan(h) || isnan(t) || isnan(f)) {
    Serial.println(F("Failed to read from DHT sensor!"));
    return;
  }

  // Compute heat index in Fahrenheit (the default)
  float hif = dht.computeHeatIndex(f, h);
  // Compute heat index in Celsius (isFahreheit = false)
  float hic = dht.computeHeatIndex(t, h, false);

  lcd.print("Temp:");
  lcd.print(t);
  lcd.print(" C");
  lcd.setCursor(0,1);
  lcd.print("Humi:");
  lcd.print(h);
  lcd.print("%");
  delay(10000);
  lcd.clear();

//  Serial.print(F("Humidity: "));
//  Serial.print(h);
//  Serial.print(F("%  Temperature: "));
//  Serial.print(t);
//  Serial.print(F("°C "));
//  Serial.print(f);
//  Serial.print(F("°F  Heat index: "));
//  Serial.print(hic);
//  Serial.print(F("°C "));
//  Serial.print(hif);
//  Serial.println(F("°F"));

}
Reference
- https://docs.arduino.cc/hardware/uno-rev3
- http://www.taichi-maker.com/homepage/reference-index/arduino-library-index/liquidcrystal-library/
- https://www.arduino.cc/reference/en/libraries/liquidcrystal/
- https://learn.adafruit.com/dht
- https://www.arduino.cc/reference/en/libraries/dht-sensor-library/
— Nov 6, 2022
Search
Made with ❤ and at ZJU.